Overview
At in-person events, attendees mill about conference halls, stopping by different vendor booths to look at their wares, make purchases, and talk with Vendors and Exhibitors.
This is an incredibly important part of any conference, and our Virtual Expo on EventHub is no different.
We replicate this experience of Attendees being able to chat with Exhibitors through our Booth Session Hours and Live Chat feature.
You determine which hours that Exhibitors can "work" their virtual booths by appearing in a video chat, while attendees can then click around to different booths and enter this video chat to meet and talk with an Exhibitor.
Let's Make it Happen
Start by accessing your EventHub account, and opening your event's Virtual Village page. Make sure you're in Edit Mode. If you need more help with this, please refer to this help article: click here.
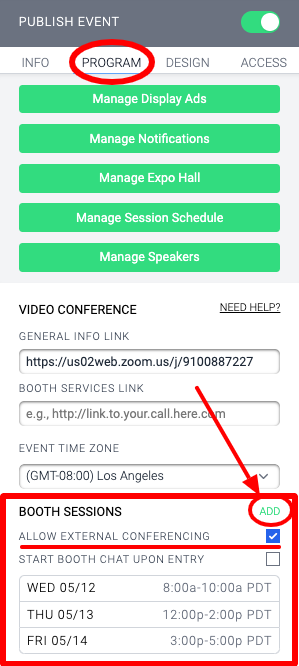
All of these features will be accessed from the Program Tab in the editing sidebar on the right.

Booth Session Hours
Under the Program tab, you will see a section called "Booth Sessions." Click ADD and put in the dates and start and end times for when you want your Exhibitors to be live in their booths so that Attendees can visit and chat with them.
NOTE: These hours do not determine how long your event runs, but rather what hours Attendees can expect to find Exhibitors on live video chat in their booths. You likely don't want to set these to run from 9am-9pm, since that would be a very long time to expect an Exhibitor to sit in front of their computer on a live video chat. We recommend a few hours each day of your conference, if it's over multiple days. But ultimately, it's up to you!
By default, these Booth Sessions are hosted by our own built-in (and free) video chat service. If you want to allow Exhibitors to use a third-party video chat (i.e. Zoom, Hangouts, Skype, etc.), you need to check the checkbox next to Allow External Conferencing (which you can see is checked in the above screenshot). If you want to restrict them from using an external video chat, keep that box unchecked. Exhibitors will always have access to EventHub's free built-in video chat regardless. Click HERE to learn how to setup this feature and experience it yourself!
IMPORTANT: It is very important that you email your vendors with the booth hours to ensure they are looped in. These are the hours that you are asking them to be sitting in front of their computer, with their video camera on, ready to talk to attendees.
- Don't forget to click Save Booth & Session Changes at the bottom of the sidebar after you've made these changes!

Accessing the Booth Sessions from Your Event Schedule Page
From the Main Page of your event, go to the "Program" tab and click "Manage Session Schedule."
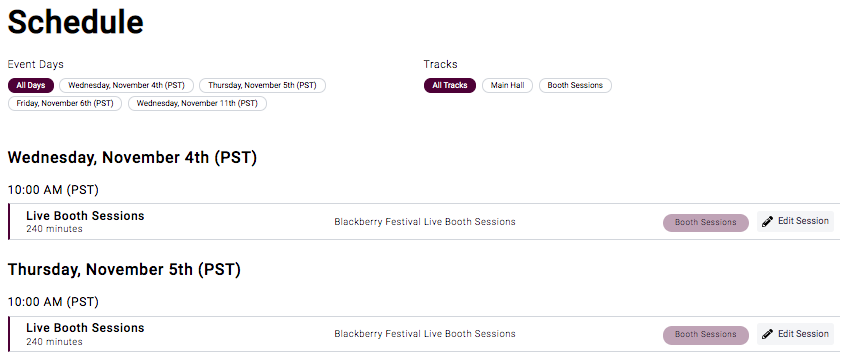
This will bring where you can see all your scheduled sessions in one place, including the Booth Session Hours you just added. It also serves as the page where you can add and manage other sessions, we cover how to this in the guide: How to Create Session Schedules and Add Speakers.
Step 1: Add the Schedule Link to Your Header
This is very important to do so that all Attendees and Exhibitors can see the schedule and the goings on at your event!
Let's take a look at the top of the page.

- Page Title: You can rename the page to change how it displays in the bar. For example, it could be Schedule, Sessions, Retreat Schedule, Breakout Rooms, etc.
- Show Schedule Link in Header: If you toggle this on, the Schedule page link (with whatever name you entered) will appear at the top of your page. It will then be accessible from every page of your Event (including at the top of booth pages).
- Upload Cover Image: click this button to upload an image for the top of this page.
- File types: Images only - jpeg, jpg and png.
- Recommended Dimensions: 1600px by 500px. You're welcome to upload an image with different dimensions, the page will display a crop preview for you to adjust and then crop to the appropriate size.
- and 5. are not covered in this guide, please click here to learn more.
Step 2: Scroll Down to See Your Booth Sessions
As you scroll down the page, you will see that the Booth Session Hours that you added from the Program tab on the Main Stage appear on this page as well!

If you click on either of these sessions, it will redirect you to the Main Hall, but jump the window down to the Virtual Booths. This helps people know exactly where to go to meet Exhibitors when the booths are live!
Step 3: Booth Sessions alongside Main Hall Sessions
You may have noticed that on Friday, we have both Main Hall Sessions and Booth Sessions scheduled. If you scroll further down the schedule page, you will see that they appear interwoven with their respective start times on this page.

You can see that the labels on the right denote whether this is a Main Hall session, or Booth Sessions.

You're ready to go!
All you sessions appear on your Schedule page, which Attendees and Exhibitors alike can access from the link in the header. This will help them know when things are happening, and easily access the booth sessions to talk to Exhibitors when they're in live chat!
Suggested Articles
How to Create Session Schedules and Add Speakers


Comments
0 comments
Please sign in to leave a comment.