Overview
At in-person events, attendees mill about conference halls, stopping by different vendor booths to look at their wares, make purchases, and talk with Vendors and Exhibitors.
There is also typically a Main Hall or Main Stage with content running throughout the event. Whether this is pre-recorded content, or a live chat, it's the content people come for.
Our Virtual Expo on EventHub is no different. We replicate this experience with our Main Stage Sessions.
Jump to the sections for more info:
Let's Make it Happen
Start by accessing your EventHub account, and opening your event's Virtual Village page. Make sure you're in Edit Mode. If you need more help with this, please refer to this help article: click here.
All of these features will be accessed from the Program Tab in the editing sidebar on the right.
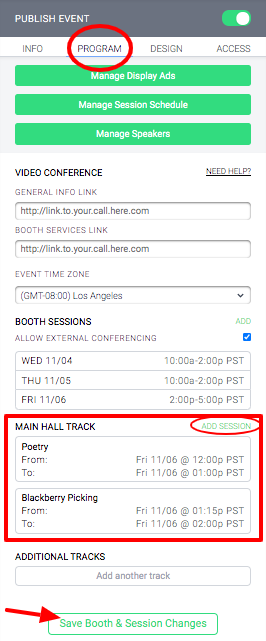
Main Stage Live Streaming
You see the "Main Hall Tracks" section. These "tracks" are videos that are scheduled to play in your Main Hall at the specified date and time.
Click "ADD SESSION" on the right to create a new one, or just click on one already there to edit. An "Edit Sessions Stream" pop up appears, where you can enter:
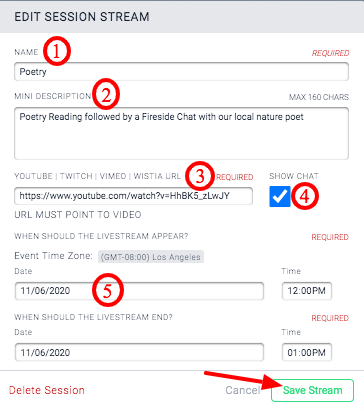
- Name of your Session/Track
- Mini Description: This description will appear on the Schedule page preview, as well as the detailed Session page (more on this below).
- Streaming URL: Enter the YouTube, Twitch, Vimeo, or Wistia URL.
- Show Chat: When your livestream is live, the side chat bar will be available for viewers to interact with you. If you do not want users to be able to chat you or your livestream is prerecorded, uncheck this box. PLEASE NOTE: If the stream is coming through another platform, you need to make sure Chat is enabled from there (YouTube, Vimeo) for it to show up here.
- Start Date/Time & End Date/Time: When your livestream should appear using this link at the top of the Main Event Page.
NOTE: We schedule the sessions every 15 minutes, and you cannot change the start and end time to something other than the 15 minute mark. If you have a bunch of short videos, and want them all to autoplay together in the same 15-minute Main Stage session, you can do this by creating a YouTube playlist and linking the URL of the first video in the YouTube URL field in that pop up. For step-by-step instructions on how to do this, please refer to our article on Using YouTube Playlists to Autoplay Videos.
The Main Stage video floats with the attendee as they scroll down the page and through the virtual village and exhibitor's booths. See the example below of how the livestream has a chat, and floats with the user as they scroll down the page.
Accessing the Main Stage Sessions from Your Event Schedule Page
From the Main Page of your event, go to the "Program" tab and click "Manage Session Schedule."
This will bring where you can see all your scheduled sessions in one place, including the Main Stage Sessions you just added. It also serves as the page where you can add and manage other sessions, we cover how to this in the guide: How to Create Session Schedules and Add Speakers.
Step 1: Add the Schedule Link to Your Header
This is very important to do so that all Attendees and Exhibitors can see the schedule and the goings on at your event!
Let's take a look at the top of the page.
- Page Title: You can rename the page to change how it displays in the bar. For example, it could be Schedule, Sessions, Retreat Schedule, Breakout Rooms, etc.
- Show Schedule Link in Header: If you toggle this on, the Schedule page link (with whatever name you entered) will appear at the top of your page. It will then be accessible from every page of your Event (including at the top of booth pages).
- Upload Cover Image: click this button to upload an image for the top of this page.
- File types: Images only - jpeg, jpg and png.
- Recommended Dimensions: 1600px by 500px. You're welcome to upload an image with different dimensions, the page will display a crop preview for you to adjust and then crop to the appropriate size.
- and 5. are not covered in this article, please click here to learn more.
Step 2: Scroll Down to See Your Main Stage Sessions
As you scroll down the page, you will see that the Main Stage Sessions that you just added from the Program tab on the Main Stage appear on this page as well!
You may have noticed that on Friday, we have both Main Hall Sessions and Booth Sessions scheduled. They appear interwoven with their respective start times on this Schedule page.
You can see that the labels on the right denote whether this is a Main Hall session, or Booth Sessions.
You can see here that all the details you added previously appear on the schedule page, including the Start time, Title, and Mini Description.
Step 3: Click to go to a Session Page
Click on the Title or Description are to be taken to the Session Edit page.
Step 4: Add Details and Speakers to the Session Page
You can add more detail about this Main Stage Session by clicking the "Edit Description" button. This description will only appear on this page, not on the Main Hall or in the Schedule Page preview text. That preview text is the "Mini Description" in the right editing sidebar.
You can also associate a Speaker with this session, by clicking over into the Speaker tab at the top right of the editing sidebar. This is an optional step.
If you don't see any Speakers in this dropdown, it's because you haven't added them! We cover how to add them (and more) in-depth here: How to Create Session Schedules and Add Speakers.
Step 5: Watching the Main Stage Content
The Main Stage content will autoplay if someone is just on the Main Hall page, or clicking around booths. But you can also access this from the Session page, by just clicking the little link icon.
This will take the user to the Main Hall page, where, if it's during the time this content is live, the content will be autoplating at the top of the page!
Suggested Articles
How to Create Session Schedules and Add Speakers
Adding Live Chat Booth Sessions For Your Exhibitors
Comments
0 comments
Please sign in to leave a comment.