At in-person live events, there's typically a loudspeaker or way of notifying all attendees about an upcoming live session, booth giveaway, etc.
We have are own version of this for your virtual event with notifications!
These notifications will either pop up in the middle of the screen or slide in in the bottom righthand corner, and they can
- direct attendees to a booth
- direct attendees to a URL
- or simply inform them with a message
Example of a pop-up notification directing users to a booth below!
Let's Get Started
Start by accessing your EventHub account, and opening your event's Virtual Village page. Make sure you're in Edit Mode. If you need more help with this, please refer to this help article: click here.
You access these features from the Program Tab in the editing sidebar on the right.
Click "Manage Notifications"
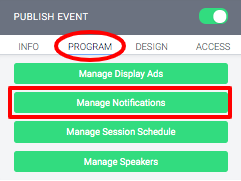
This will take you to a view to Create and Manage all notifications for your event.
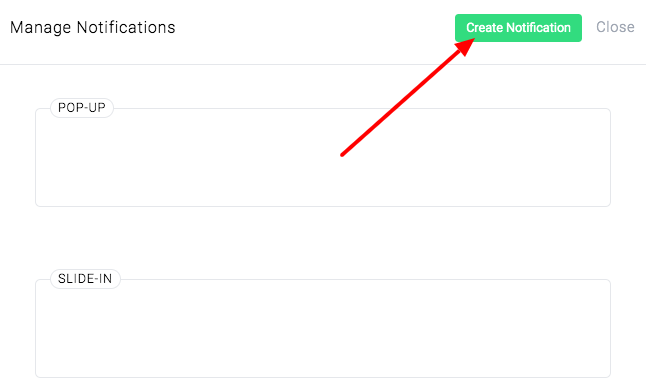
To Create a new one, click on "Create Notification" in the upper righthand corner.
This will open up the following view where you can add all the details about your notification.
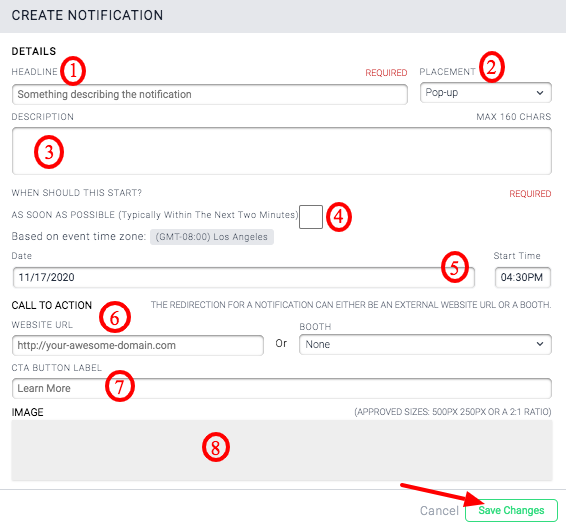
- Headline: This will be the text that appears large and at the top of your notification
- Placement: Choose where you want this notification to be a Pop-Up (in the middle of the page) or a Slide-In (bottom right corner of the page). We've selected Pop-Up here.
- Description: Optional text if you want to add more information.
- ASAP Checkbox: Check this box if you want the notification to show up as soon as possible for everyone who is currently on your event.
- Date and Time: Select when you want the notification to pop up.
- Call to Action: Optional -- you can add a button so that the notification can redirect to either a URL or a Booth. You can leave this blank if you just want your notification to be a message that doesn't direct anywhere.
- CTA Button Label: If you do choose to have a Call to Action, then there will be a button on the notification for users to click on. Enter text here for what you want the button to say. If left blank, it will default to "Learn More."
- Image: Optional -- you can upload an image to show on your notification.
- File types: jpeg, jpg and png.
- Preferred measurements: 2:1 ratio, like 500px by 250px for example.
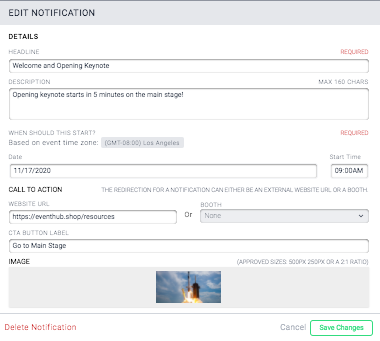
Once you fill in all this info and add an image, it'll look something like this:
Once you add Slide-in and Pop-up Notifications, your page will look like this:
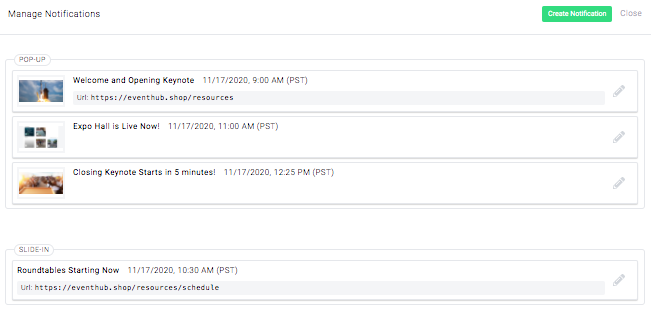
NOTE: If you remain on this view, you will not see the notifications. You need to exit this view by clicking "Close" in the upper right, and then you will see your notifications appear on any of your event pages.
That's right! Regardless of whether a user is on the Main Stage, a Session page, a Booth, etc., they will all receive the notification.
What It Looks Like
A user can click to dismiss a notification, like in this video:
Or click to open a URL or jump to a booth. We preview jumping to a booth below:
Here's an example of a slide-in notification, which appears in the bottom right corner:
And there you have it!
An additional functionality of this is if you have some urgent message that you want to send to everyone immediately, you can check the Send As Soon As Possible box when you're creating the notification and it will be shown to everyone in the next two minutes.
Have fun notifying!!


Comments
0 comments
Please sign in to leave a comment.