Learn more about our virtual programming features!
These include:
- Session pages that can host video chat presentations or recorded streams for applications such as side stages, panels, workshops, and breakout sessions at virtual events.
- A schedule and Tracks page for creating alternate program tracks to the main stage, and showing the schedule with filter options for attendees.
- Speaker bio pages and a Speakers page to show all speakers or performers at an event.
- All three of these features play nicely as Sessions can be assigned to tracks, and Speakers can be attached to their scheduled Session pages to show which speakers are presenting a given session. A Speaker page also shows which sessions they are attached to.
Take a look at an example of an event using these features in the video below, then learn how to add them yourself!
Topics Covered in this Article
Getting Started
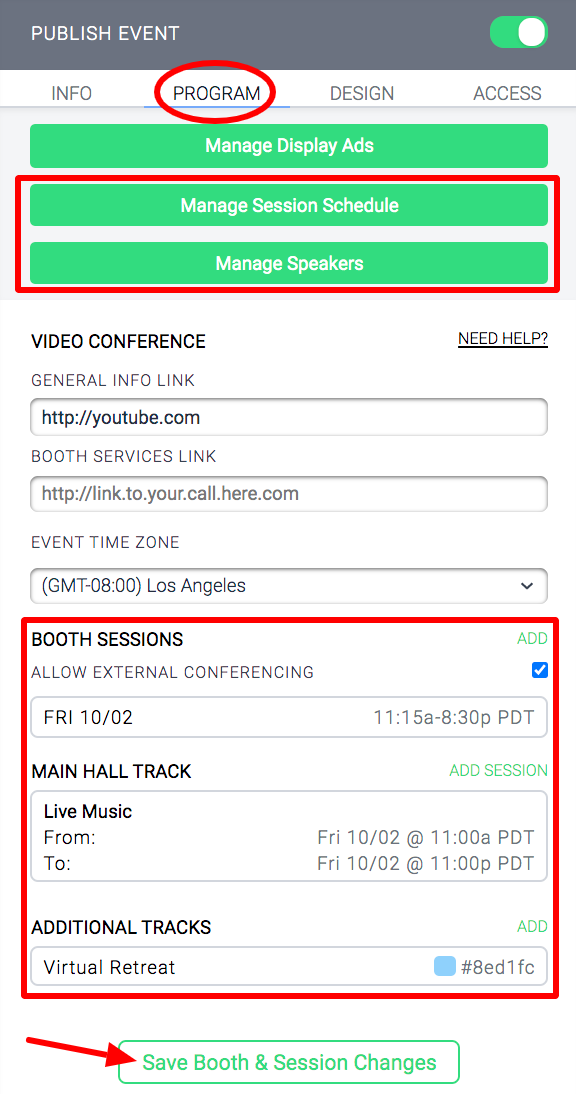
All of these features will be accessed from the Program Tab. Make sure you're on your event in Edit Mode. If you need more help with this, please refer to this help article: click here.
Adding Sessions and a Schedule Page to Your Event
So you have your Main Stage all setup with what videos are going to air when, but what if you want to host a side stage, panel, workshop, or breakout session at your event? Think about this similarly to an in-person conference. There's a lot of action on the Main Stage, but there are likely panels and presentations happening elsewhere as well. This is your online place for that.
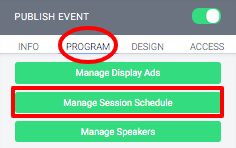
From the Main Page of your event, go to the "Program" tab and click "Manage Session Schedule."
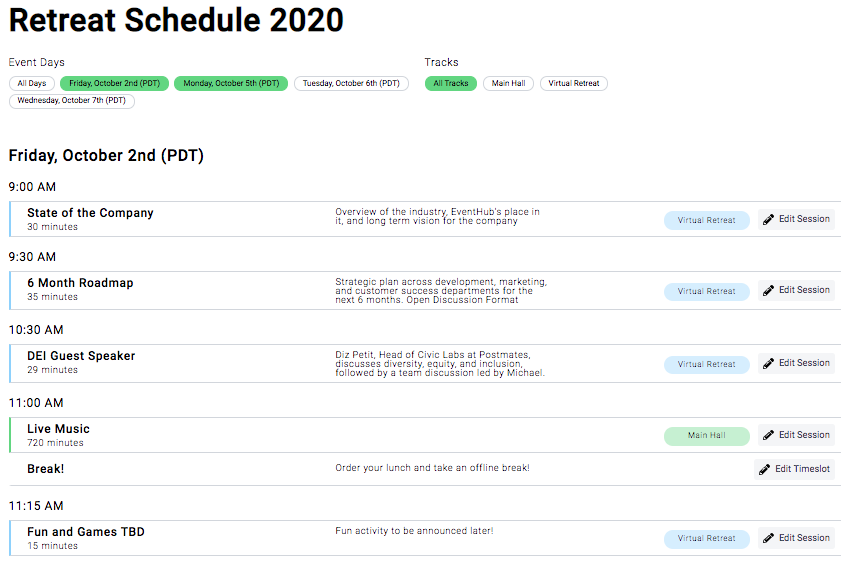
This will bring you to a page where you can add and manage sessions. It also serves as the page to see all your scheduled sessions in one place, including Main Stage Sessions and Booth Session Hours, so we refer to this as the Schedule Page.
For more information on how to add these other types of sessions, please refer to our guide on Adding Live Chat Booth Sessions For Your Exhibitors.
Schedule Page
First, let's take a look at the top of the page.

- Page Title: You can rename the page to change how it displays in the bar. For example, it could be Schedule, Sessions, Retreat Schedule, Breakout Rooms, etc.
- Show Schedule Link in Header: If you toggle this on, the Schedule page link (with whatever name you entered) will appear at the top of your page. It will then be accessible from every page of your Event (including at the top of booth pages).
- Upload Cover Image: click this button to upload an image for the top of this page.
- File types: Images only - jpeg, jpg and png.
- Recommended Dimensions: 1600px by 500px. You're welcome to upload an image with different dimensions, the page will display a crop preview for you to adjust and then crop to the appropriate size.
- Add Session: This is how you'll add all the extra sessions for your event that aren't on the Main Stage. More on this below (click here to jump to that section).
- Add Timeslot: Use this button to add a Timeslot that is not a session, for example, a Lunch Break, Bio Break, or Coffee Break, something that is non-interactive, where you don't have content to share with participants. When you click the "Add Timeslot" button, a pop up will appear asking for details:
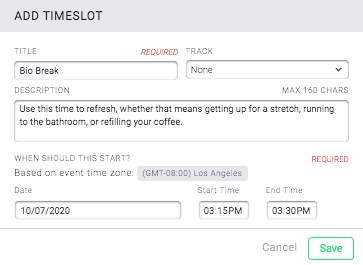
Enter a title and set the correct start and end times (make sure to double-check the timezone!). You can add additional info if you would like (more on tracks later). Remember to click "Save" in the bottom right corner.
Now your timeslot will appear on the overall schedule page like so:

You can always edit it with the button on the right to change any details. Note that this is a non-interactive timeslot, meaning that attendees will not be able to click into it or anything, and there is no interactive programming (like a video or chat).
Adding Sessions
This is where you get to add your sessions that are separate from the Main Stage. These are the side stages, panels, workshops, or breakout sessions at your event. When you click "Add Session" at the top of your Schedule page, you'll see this pop up:
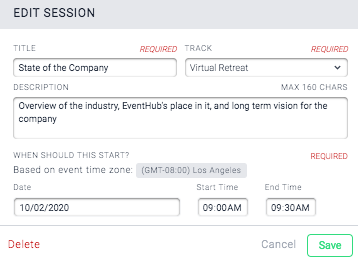
But wait, what's that "Track" field?
Adding Tracks
A Track is a category that groups related sessions. Think of this in relation to an in-person event, where all events related to the same thing might appear on the same stage, or room. But instead of "Room 1" sessions, we have Tracks to group these sessions. Then, the Schedule stage can be filtered by certain tracks, so if someone only wants to see sessions related to the "Career Development" track, they can! You can also view all sessions, regardless of track. Or select multiple tracks to filter, for example if you wanted to attend both "Career Development" sessions and "Networking." Or, if we think of a more entertainment-based conference, "Movies/TV" and "Videogames."
At the very top of your schedule page, there's a hyperlink that says Manage Tracks. Click this button, and it will take you back to your Main Stage page, with the "Program" tab open on the righthand side. Scroll to the bottom of this sidebar and you'll see the "Additional Tracks" section right below the "Main Hall Track."
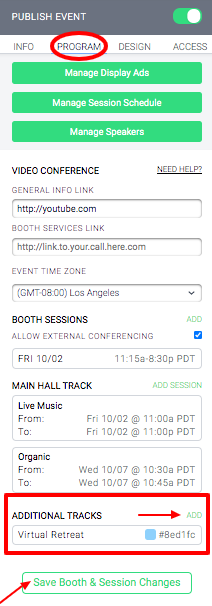
Click the green "ADD" button, and you'll get this pop up:
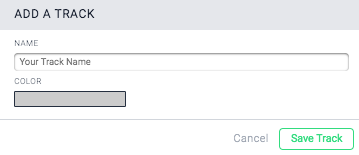
Here you set
- The name of your track. For example, "Career Development" or "Breakout Rooms."
- Choose a color for the label that will represent your track on the schedule page.
Don't forget to click "Save Track" on this pop up, and then "Save Booth & Session Changes" in the sidebar.
Now, back to that "Add Session" pop up
Go back to your Schedule page, where we were entering details about our new Session. One of those details is the Track. Since we've created a "Virtual Retreat" track, we can fill out the rest of the details and see what it looks like on the Schedule page.


Here you can see
- Title
- Start Time (above the box)
- Duration
- Description
- Track label (we made our color for this particular track blue)
You can bring up the editing pop up box again by clicking "Edit Session" on the right side of this bar, but to actually enter your session and set up the event, click on the title or description of the Session in this bar.
Editing a Session Page
Clicking on one of the Session bars, you'll be taken to a page where you can add all details and settings, and interactive content, like a video, virtual chat, or external conferencing link.
Filling out Session Info in the Info tab
**You can send this to your Speakers to fill out themselves! Once a Speaker is associated with a Session page, they can edit that page. How do you associate a Speaker with a Session page? Read on...**
If you are going to have Speakers fill out their own bio + info pages, you must FIRST add them as Speakers before linking them on a Session Page. Please click here to go to our help article on how to add your Speakers.
Adding Speakers to a Session in the Program tab
For information on how to connect a Speaker to a session, please refer to this help article.
Filling out Session Info
Remember, you can do this, or you can send it to your Speakers to fill out.
Let's take a look at the "Info" tab in the sidebar.
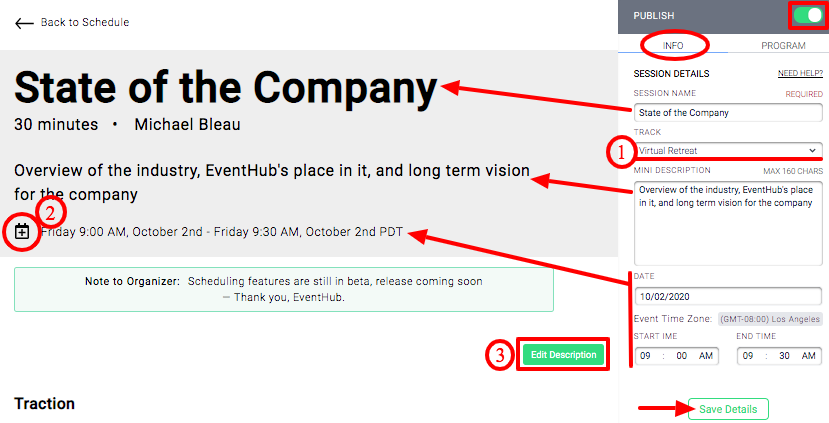
The arrows here represent your ability to edit things that you may have already set when you created the session, but you can always change them here and those changes will be reflected on the Schedule page.
The other features here are
- Track: The ability to add or edit the Track a session is associated with
- A button that allows attendees to add this session to their personal calendars, with a direct link to this exact Session page. This calendar button also appears on the Schedule page when you're in Attendee View.
- Edit Description: You can click this button to add detail, photos, videos, link, etc. to this session. We have some charts there, but it's secret company data and we couldn't share it with you in that screenshot. 🙃
Don't forget to Publish your session to make it accessible to speakers and attendees, using the green toggle at the top!
Adding Programming to a Session (Video, Live Chat, Zoom Embed, External Conferencing)
Click into the "Program" tab on the sidebar.
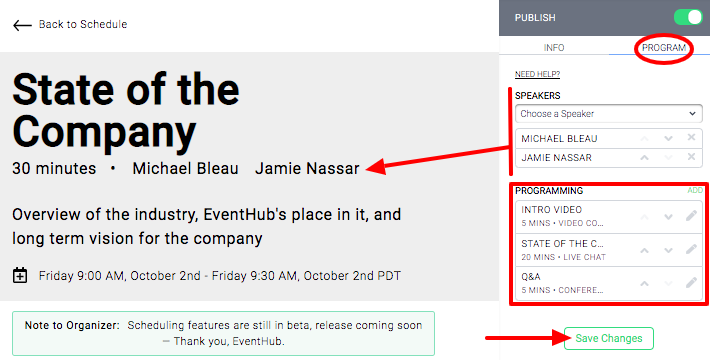
Now, under the "Programming" section of the "Program" tab on the sidebar, you can break down your session into different types of content.
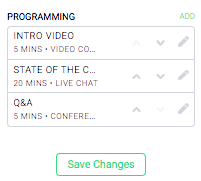
Here, we have an Intro Video for 5 minutes, then a 20 minute presentation through EventHub's built-in (and free!) Live Chat, then 5 minutes of Q+A hosted on an external platform. Make sure not to create sessions that go beyond your allotted time for the session! In this case, our session is 30 minutes long, so the lengths of these segments totals to 30 minutes.
You can use the arrows to reorder these, just like you can with the Speakers. Remember to click "Save Changes" whenever you make any alterations!
Each section of programming will become available exactly at the start time, and cutoff immediately when the endtime is reached, starting up the next one. You cannot extend, and the video will stop playing, or the built-in Live Chat will automatically terminate. Make sure you get everything in before this happens!
Click the following links to learn more about what each type of programming is, and how to add them:
- Built-in Live Chat: Use our free, built-in Video Chat service to have Video calls hosted right in your session page!
- Zoom Embed: This content will appear as a Zoom Meeting or Webinar, but embedded right at the top of your session page!
- External Conferencing Link: Choose this to display a button that will link out to an external conferencing platform.
- Video Content: Share a video that will play at the top of your session page.
Filtering the Schedule Page
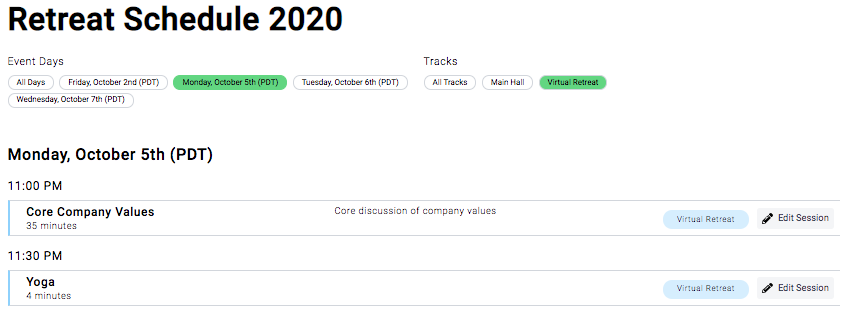
Once you add all your sessions and their associated tracks, you can return to your completed Schedule page. Here, at the top, you can filter by both Event Days and Tracks.
Selecting more than one shows you all events on that schedule that match either of the dates, or filters. To just filter on one of them, you need to deselect the others.


Comments
0 comments
Please sign in to leave a comment.