

Topics Covered:
Overview
Dealing with paperwork is often one of the more frustrating parts of managing an event. Our documents manager aims to make this process much easier for everyone.
To add document requirements for your exhibitors, start on the Required Documents tab on your Edit Showcase wizard. Get there by signing into EventHub, then hovering over your name on the top right and clicking "My Event Hub" from the dropdown. Then select Edit Showcase Page for the event you would like to add document requirements to and select Required Documents from the tabs column on the left.
Note Before You Begin:
-
Only PDF documents should be uploaded! Other file types cause compatibility issues in the Document Manager and can be confusing for the exhibitors.
-
Required Documents will be accessible to the exhibitor only after their order has been approved. If you require certain acknowledgments have questions you would like answered upfront, you can add them as custom questions to be answered during the exhibitor's application process.
-
Folders with no documents will not be visible to the exhibitor! If you require an upload from them, such as a COI, add an example or an information/instruction sheet to trigger an upload requirement.
Document Folders
Before adding documents, it is important to customize the folders. Folders allow you to customize which exhibitors will need to see specific documents based on their Participant Category.
A few default folders will already be available for you to utilize. These are some of the most commonly used folder types. However, you can add or remove whatever folders you need to best organize paperwork deliverables for your event.
Add/Delete a Folder
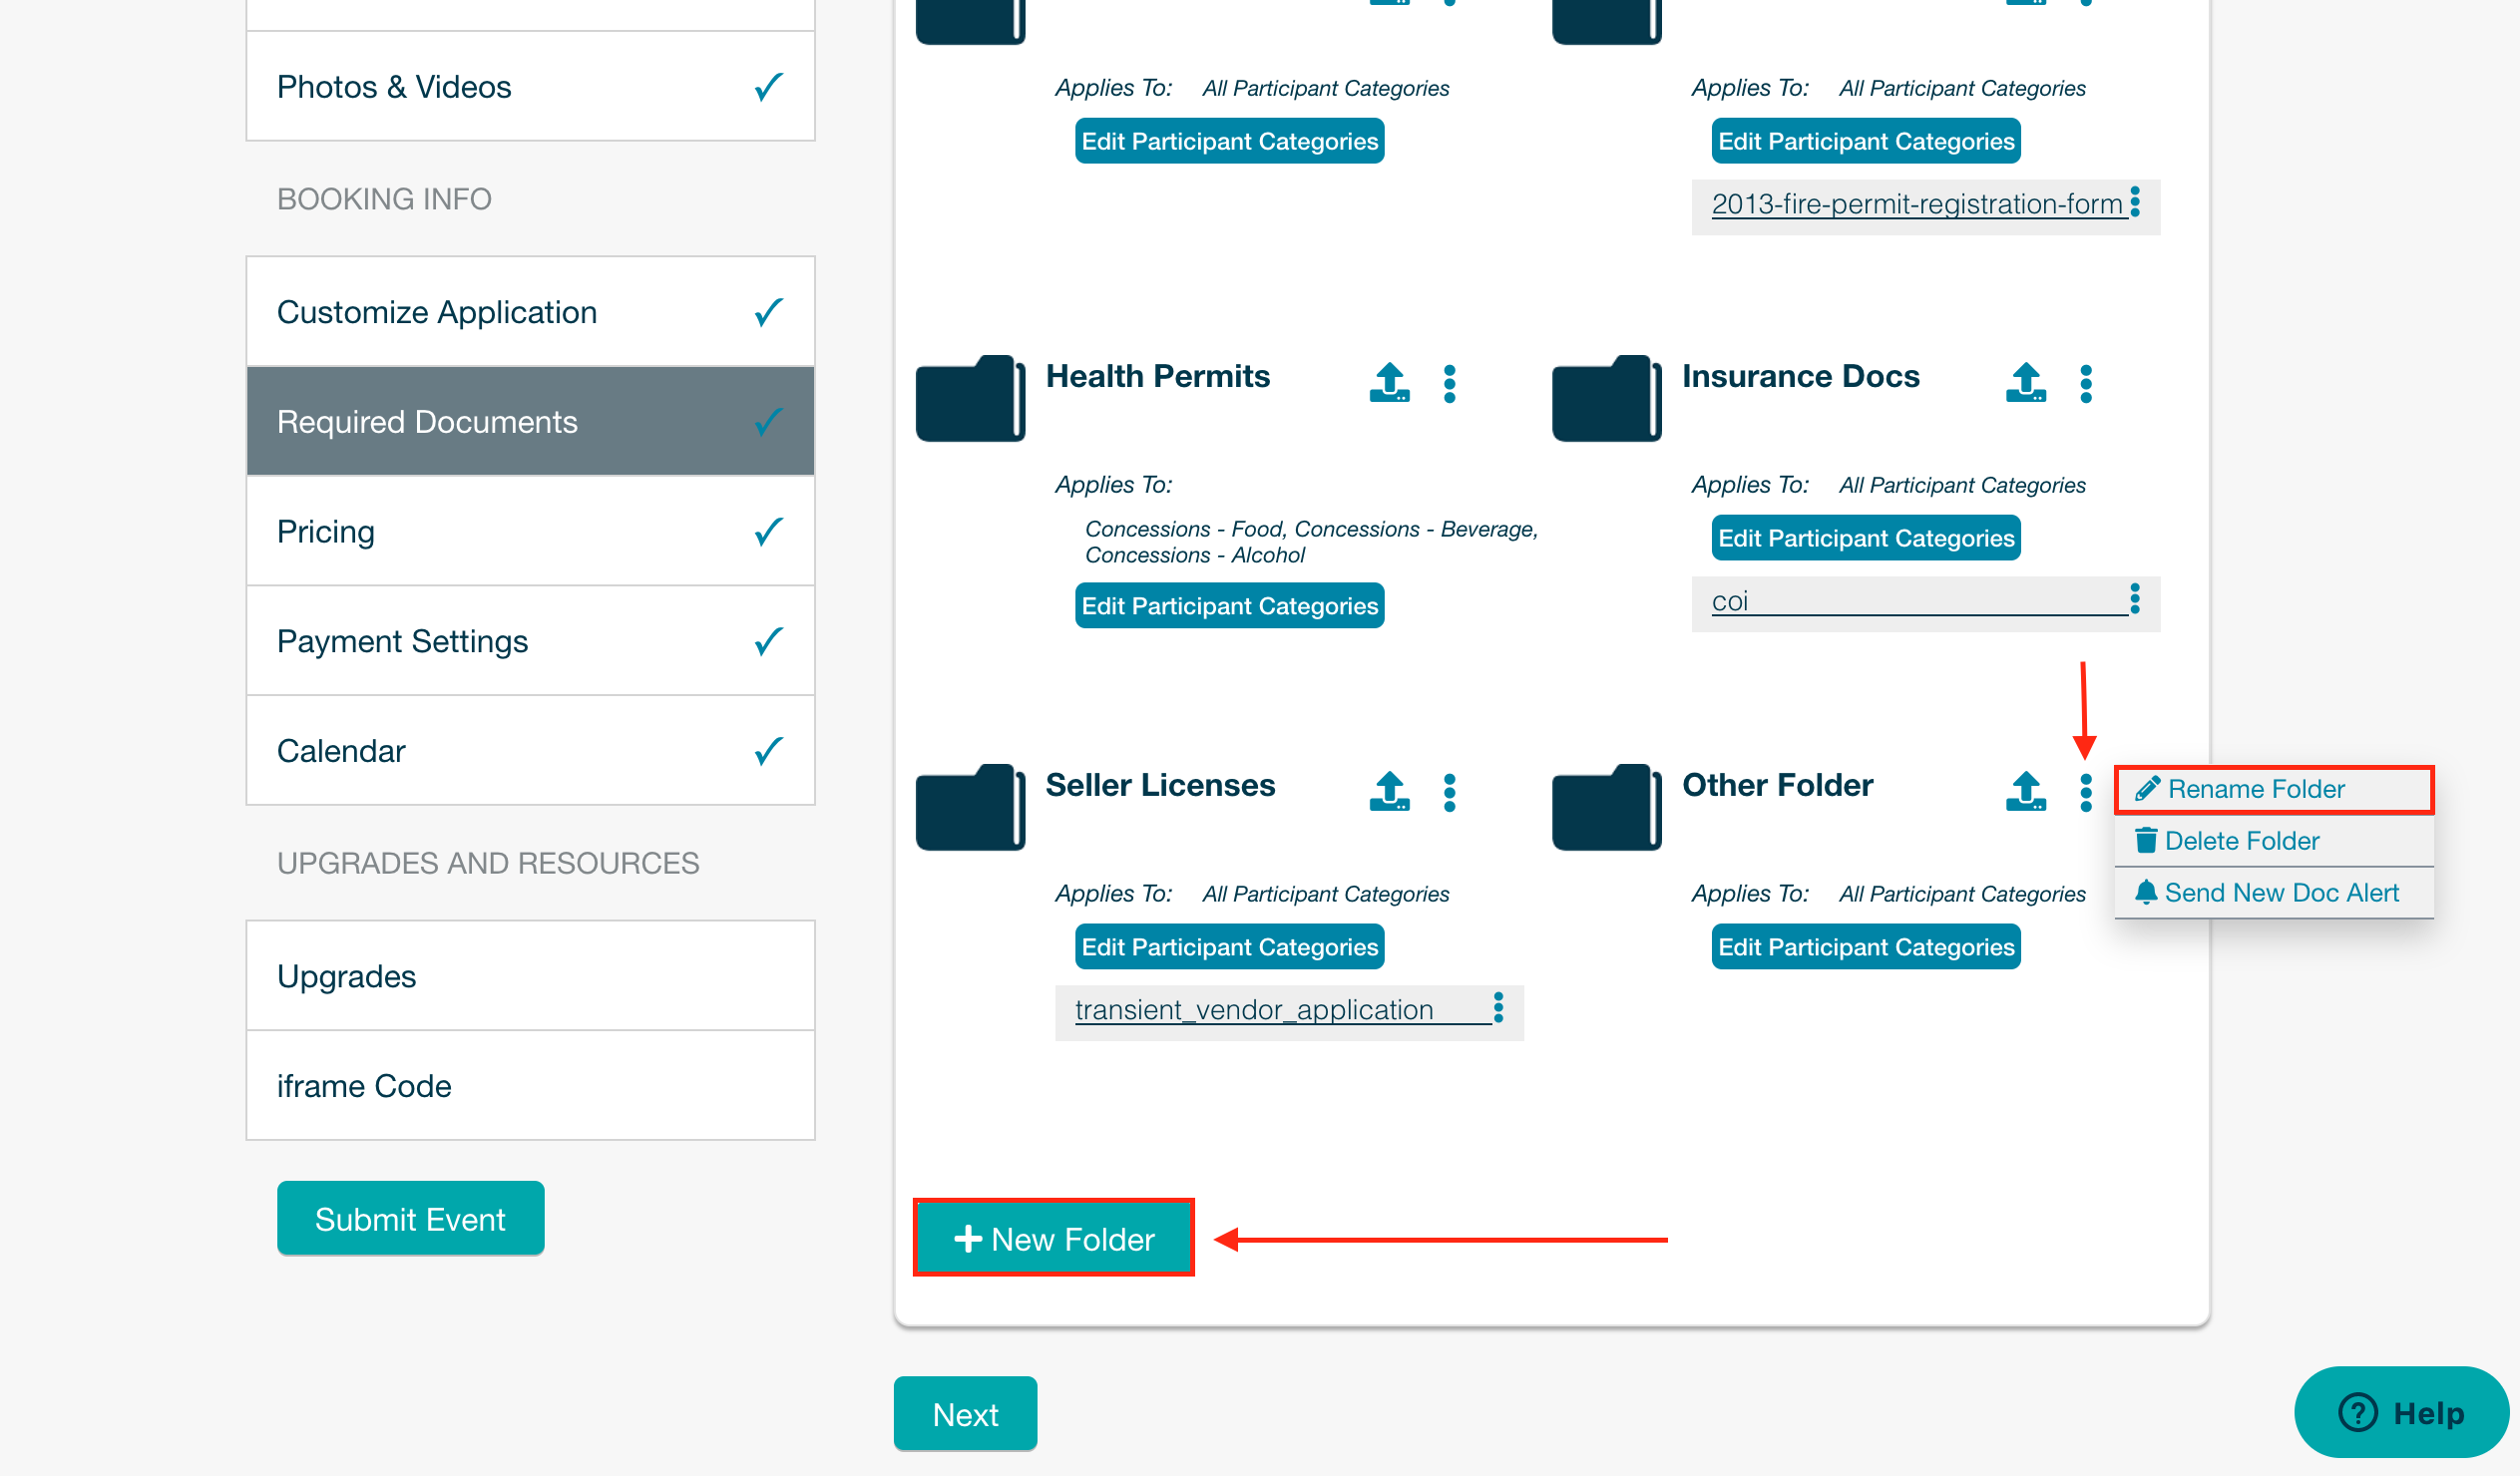
To add a new folder, click the New Folder button at the bottom of the Required Documents tab. A new folder will appear with the default name "Other Folder" You can rename the folder by clicking the three-dot menu icon to the right of the folder name and selecting Rename Folder.
If you would like to delete a folder, select Delete Folder from that same menu.
Edit Vendor Categories
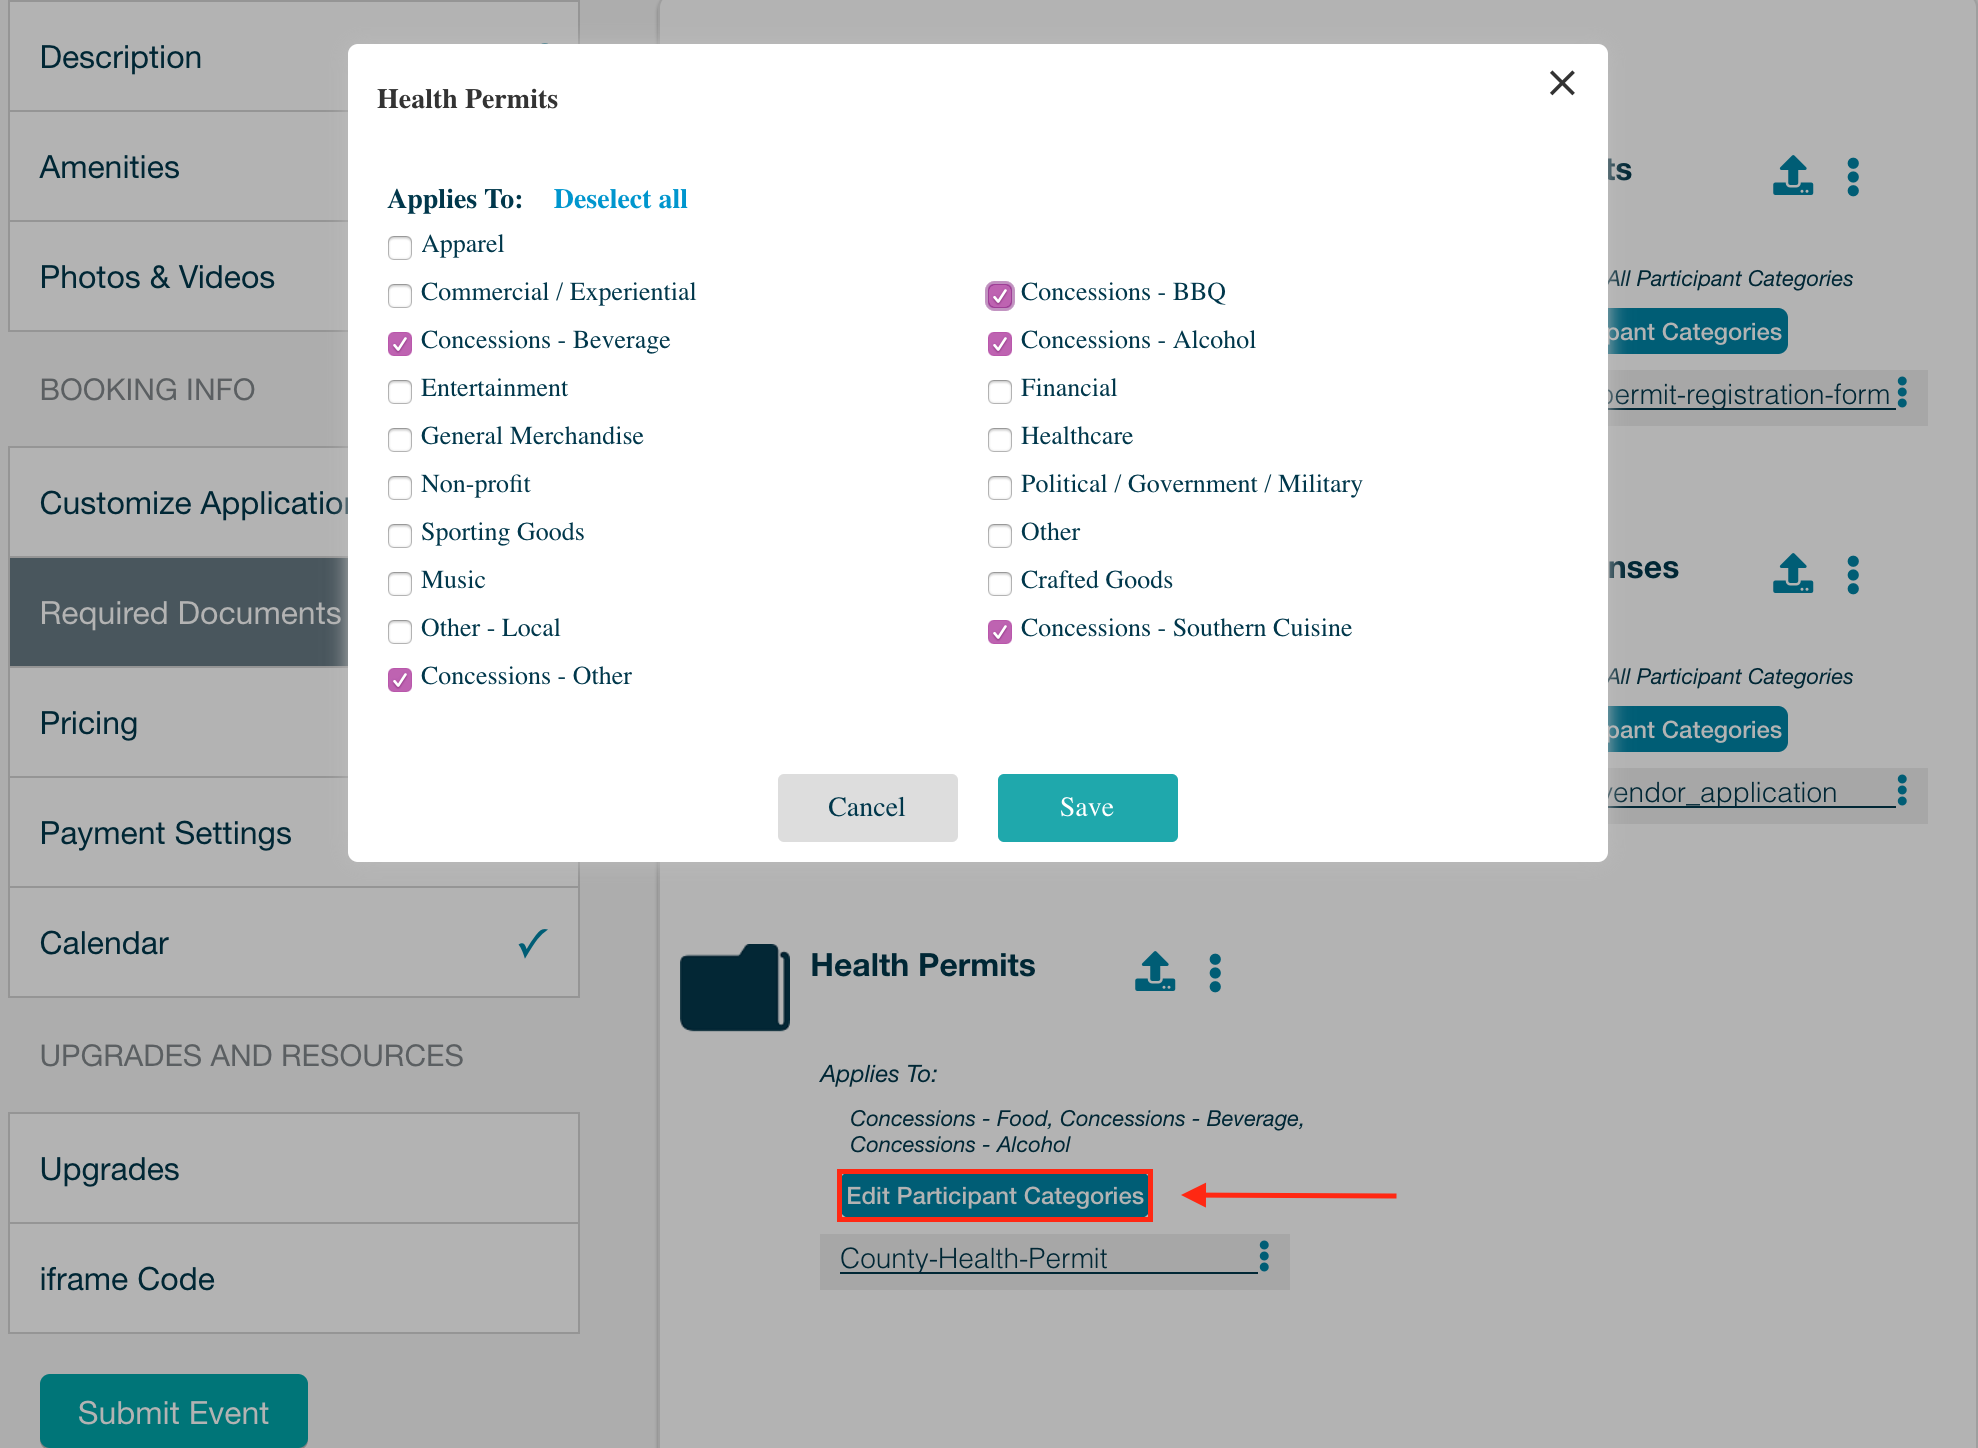
While the default requirement for each folder will be to apply to all Participant Categories, this is completely customizable. For example, if you only require health permits from your Food/Concessions categories, you can make that folder only visible to them.
To change the categories that a folder applies to, click the Edit Participant Categories button below the folder name. A pop-up will appear with your Participant Categories listed. Select Deselect All and then check the checkboxes for the categories you would like this paperwork requirement to apply to. Click Save when complete.
Adding a Document
To add a document to a folder, start by clicking the Upload icon for the folder you would like to add to, then select the document you would like to upload from your desktop. Once selected, a pop-up will appear where you can customize the document's settings.
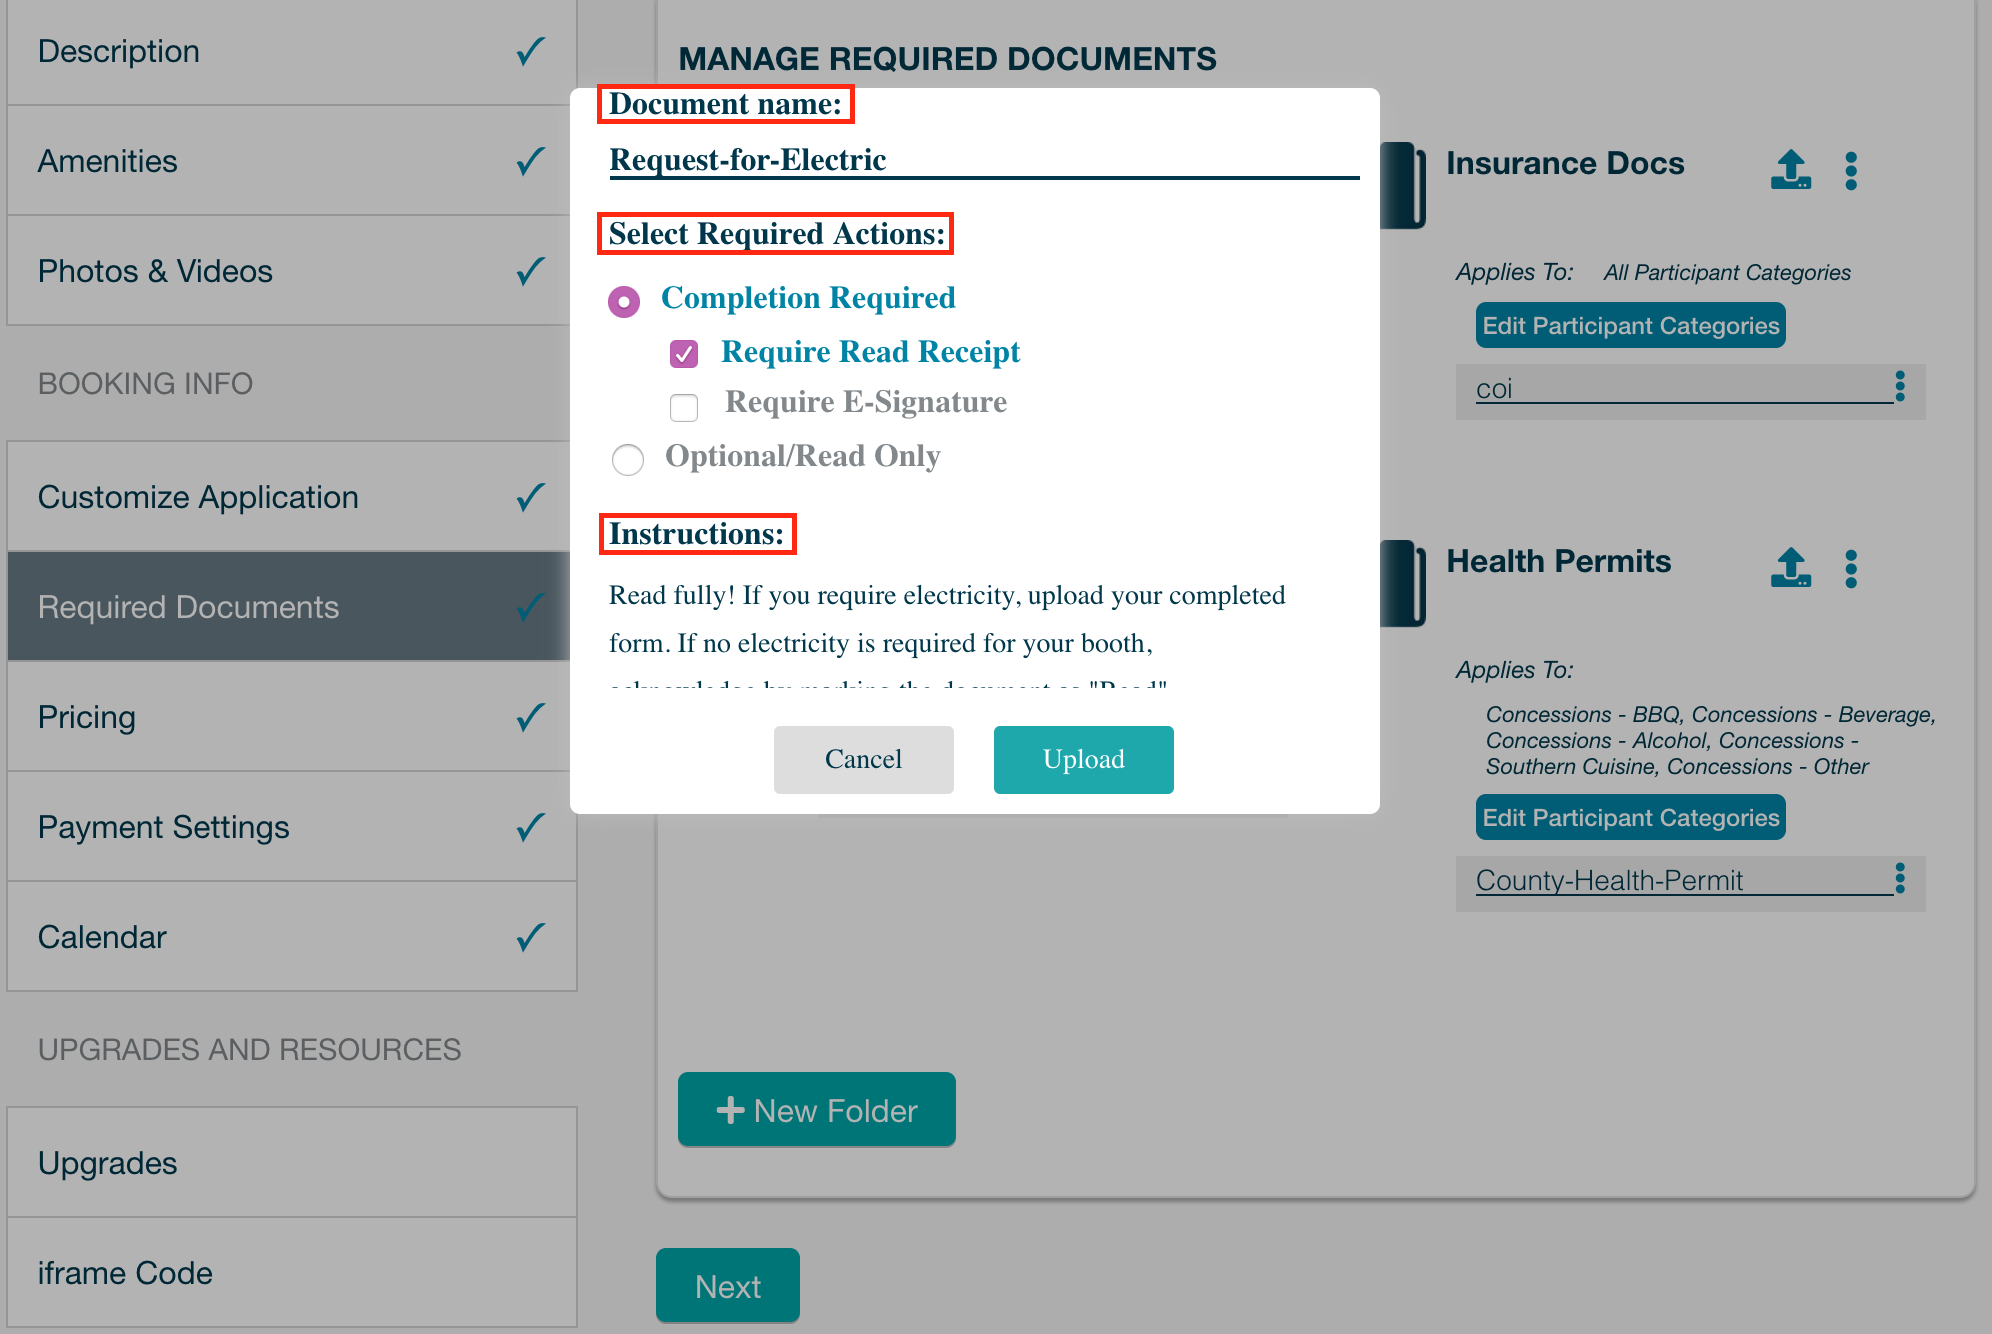
Document Name - Default names for documents can be jumbled messes. To make sure everything is organized and clear to your exhibitors, you can change the document's name.
Required Actions - You can select what action is required of the exhibitors for each document.
- Completion Required - The default requirement when this option is selected is for the exhibitor to upload a document. There are two other options for documents that require action: E-Sign and Read Receipt. E-Sign can be used for signature requirements or for shorter forms. A Read Receipt can be used when you would like the exhibitor to acknowledge the document, but it does not require any further mandatory action. More on these optional features here!
- Optional/Read Only - If the document is completely optional or is simply informational, you may choose to not require an action and mark the document as Optional/Read Only document.
Instructions - When it comes to instructions, the more the better! Use this section to clearly communicate to your exhibitors what you need.
Want to alert your exhibitors to a new document requirement? Check out this article!
If at any time you need to change the settings for a document, you can click the three-dot icon next to the file name and select what you would like to change.
Tip: Required Actions that are highlighted in blue are enabled, gray disabled.
Order-Specific Documents
Note Before You Begin:
- This feature is to upload a document for the exhibitor to complete. If you would like to upload a completed document on behalf of the exhibitor, check out this article.
Once you have approved an exhibitor's order, you can give them order-specific document requirements. Whether it's an individual sponsorship contract, or instructions for the only exhibitor of their type at your event, any paperwork deliverables you need from a single exhibitor can be uploaded in the individual Document Manager accessed through their Order Summary.
More on Document Managers here!
To upload a document for an exhibitor, click the Upload icon next to the folder called "Order Specific Docs For Customer". Once you have uploaded your chosen document from your desktop, the document will appear in the folder with the default requirement that the exhibitor upload a document in return. There are also optional actions and instructions available for you to utilize.
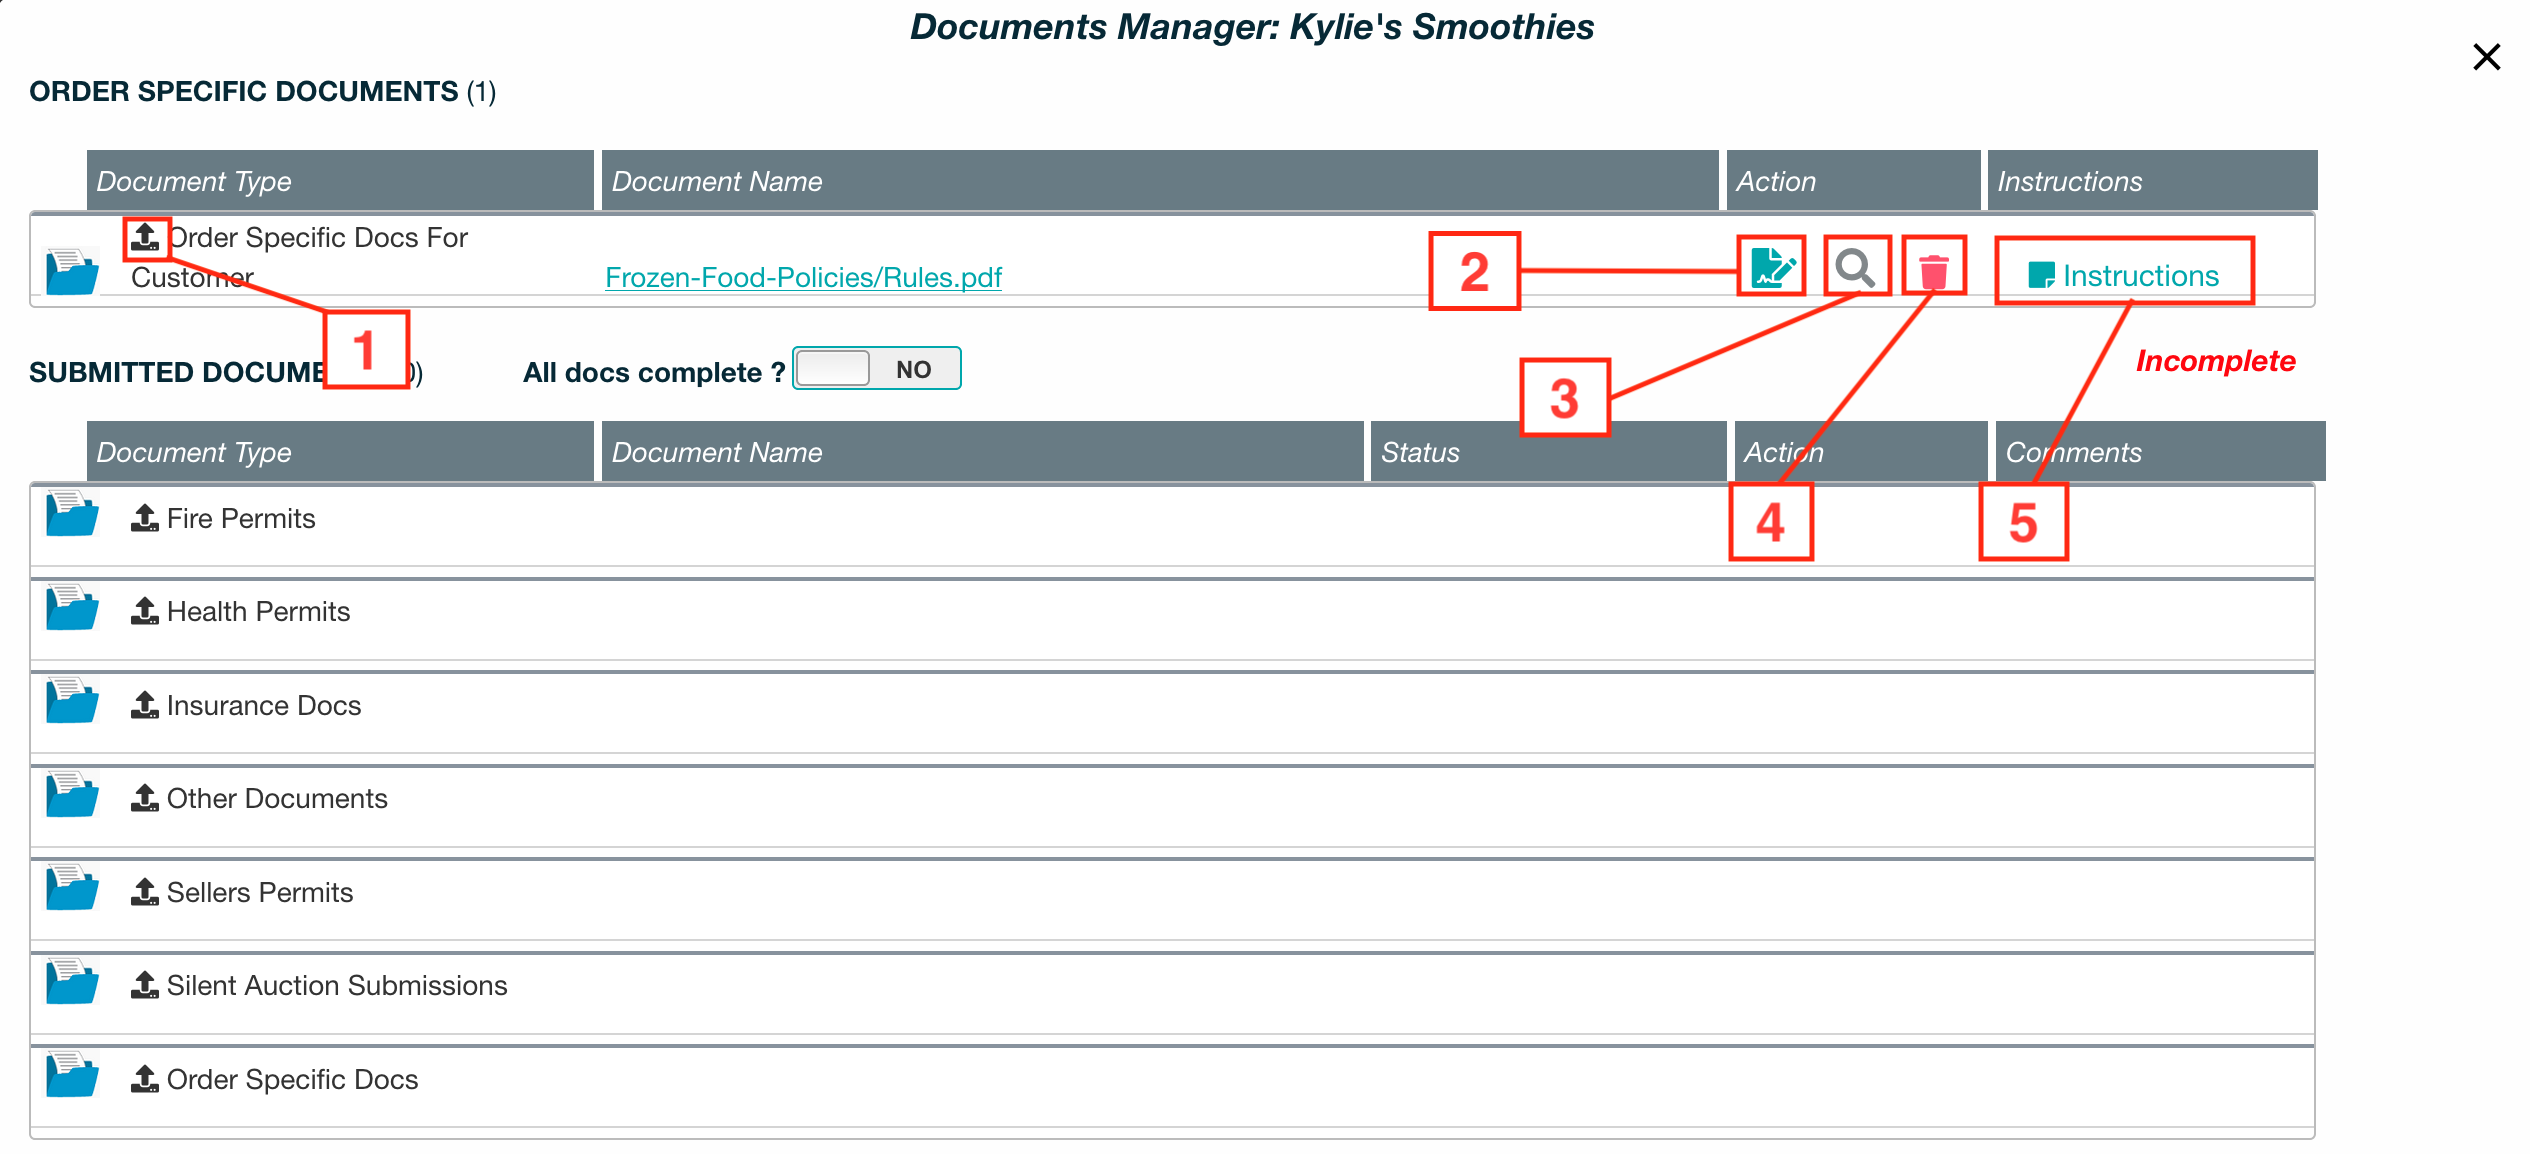
1. Upload Icon - Click to upload a document for this specific exhibitor to complete.
2. E-Sign - If you would like the exhibitor to sign the document rather than upload their own, you can enable the e-signature feature by clicking this icon.
3. Read Receipt - This icon enables the read receipt feature. The exhibitor will only need to acknowledge that they have read the document to complete this document's requirement.
- Tip: Required Actions that are highlighted in blue are enabled, gray disabled.
4. Delete - In case of a mistake, you can delete the document by clicking this icon.
5. Instructions - You can add any instructions for the exhibitor to view here.
Curious about the exhibitor's side of things? This article from the Exhibitor Help Center will show you their view: Manage Your Paperwork - For Exhibitors
Comments
0 comments
Please sign in to leave a comment.