Topics Covered:
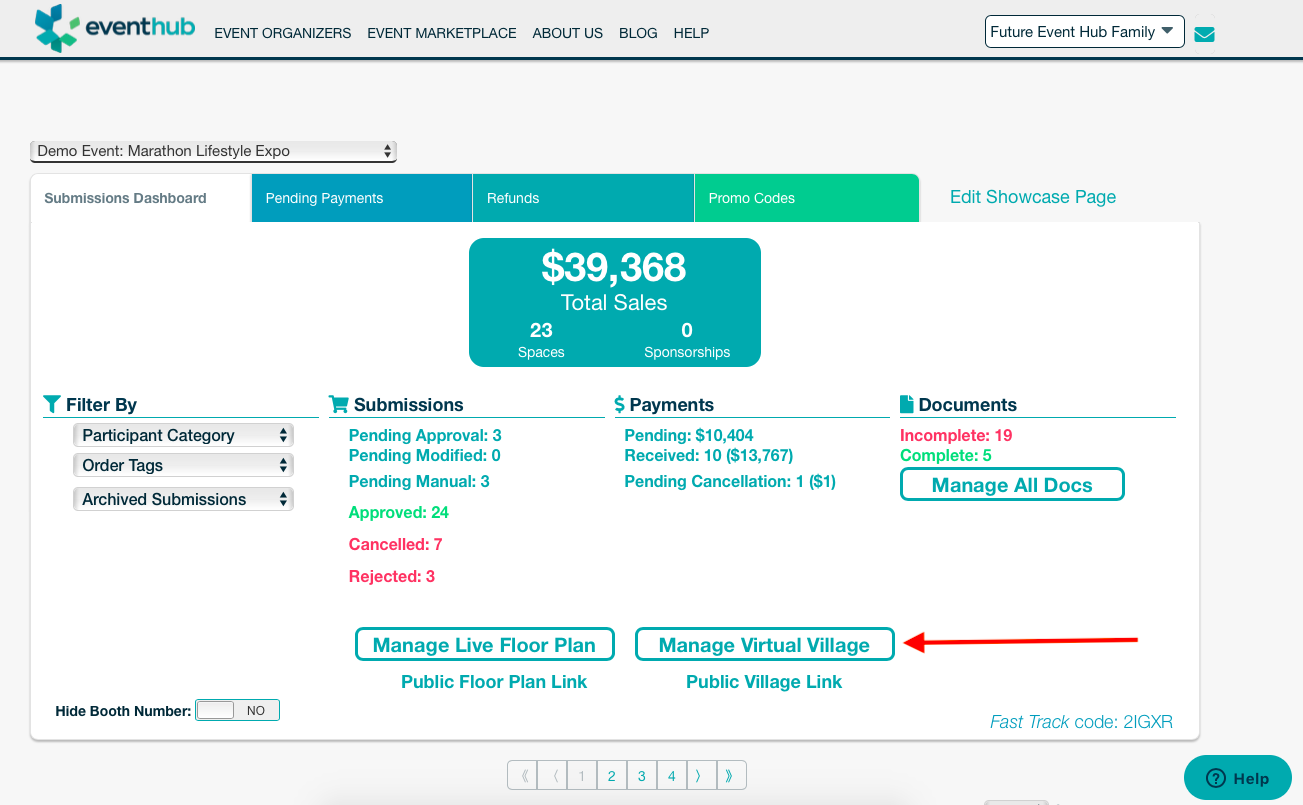
How do I get to my Virtual Village?

Designing Your Virtual Village
Always in Edit Mode
![]()
Whenever you're in your event, you should be in Edit Mode, shown as selected with an underline at the very top of your webpage.
- Edit Mode is always where you should access your event
- Click on Attendee View to copy the public url for your event and share it with all your friends and followers. This is how they will access your event when it goes live, and what their view will look like. Don't let it confuse you when you're editing.

Again, you should always be in Edit Mode to manage and make changes to your event, whether that's before the event, or when the event is live.
Step 1: Event Details in the Info Tab
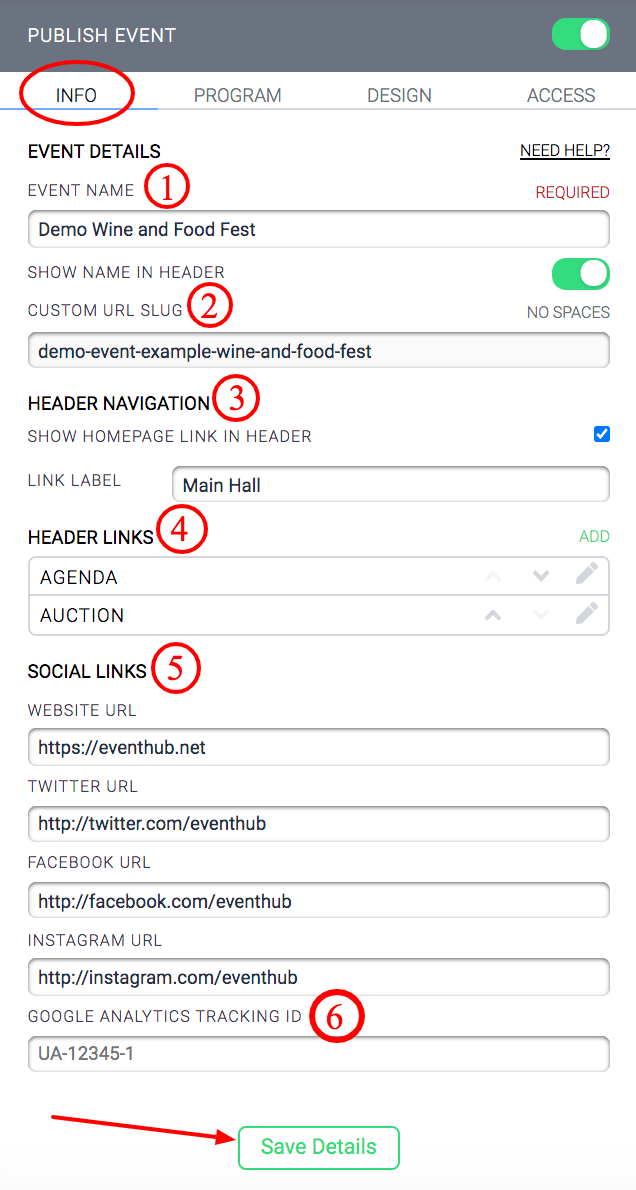
- Event Name - type in your event's name
- Custom URL Slug - This is part of the URL that comes after the domain extension - no spaces please! If you need to, use dashes or underscores. You will share this entire URL with your audience so they know where to go to find your event. (no spaces!) **NOTE: if you edit the URL slug, the old one will become unaccessible
- Header Navigation - If you want to have a link to your main event page on every booth page, check this box to enable Header Navigation. Enter the text for what you want that link to be called. Here, it's "Main Hall" and you can see it in the screenshot below. You will NOT see it on your Main Event page, because it is a link back to this page. It will be on every other booth page associated with your event.
- Header Links - These are the links that will appear at the top of the event page. Click on the pencil icon to edit the name and enter a URL, and then you can use the arrows to reorder them on your page. Remember to click Save Details and refresh the page to reflect changes.

- Social Links
- Website URL - Put your website's URL here. (formatting required: https://www.) Your customers will be able to link back to your site!
- Twitter URL - Please enter in the following format: https://www.twitter.com/enteryourhandle
- Facebook URL - Please enter in the following format: https://www.facebook.com/enteryourhandle
- Instagram URL - Please enter in the following format: https://www.instagram.com/enteryourhandle
- Analytics
- You have the option to link your account to Google Analytics to track the traffic on your event. To link your GA account, locate your tracking ID and paste it into corresponding box. For more information on linking Google Analytics, please refer to our tutorial: CLICK HERE.
- NOTE: Using Google Analytics is entirely optional. We provide our own Analytics Dashboard that you can access at the top of your page. In the same header bar that has Edit Mode, you will see View Analytics over on the right by Logout. Click this button to be taken to our built-in Analytics Dashboard! For more information, please refer to our guide on the dashboard: CLICK HERE.

Don't forget to click Save Details after updating the fields in the Info tab!

Step 2: Video Conferencing & Main Stage Stream in the Program tab
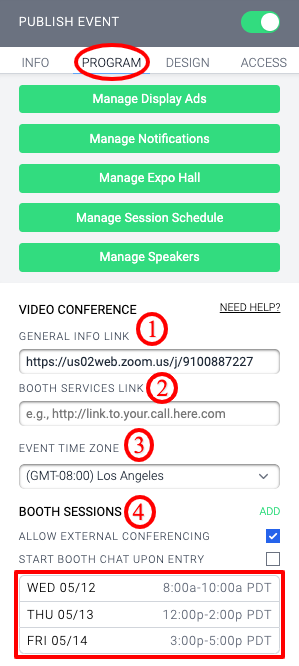
The five green buttons at the top here give you more control over Display Ads, Notifications, the Expo Hall, Session Schedule, and Speakers page. Click on each topic to be taken to their respective guides in the Help Center.
- General Info link - preferred zoom link, but also can integrate with Google Meet, Google Hangouts, Microsoft Teams, etc. This is a general info booth for your virtual attendees and the link will be accessible during Booth Sessions Hours (see #4 below).
- Booth Services Link - preferred zoom link, but also can integrate with Google Meet, Google Hangouts, Microsoft Teams, etc. This is an optional info booth you can provide for your virtual exhibitors. It will only be accessible when Booth Sessions are live, as a way for exhibitors to contact you if they have issues or questions. If you leave it blank, as we did here, the Exhibitors will not have access to chat with you over video during the event. Pro tip: for your video links, verify your access settings are as desired. For example "anyone with the link can have access."
- Booth Sessions - Click ADD and put in the dates and start and end times for when you want your Exhibitors to be live in their booths so that public Attendees can visit and chat with them.
- NOTE: These hours do not determine how long your event runs, but rather what hours Attendees can expect to find Exhibitors on live video chat in their booths.
- By default, these Booth Sessions are hosted by our own built-in (and free) video chat service. If you want to allow Exhibitors to use a third-party video chat (i.e. Zoom, Hangouts, Skype, etc.), you need to check the checkbox next to Allow External Conferencing (which you can see is checked in the above screenshot). If you want to restrict them from using an external video chat, keep that box unchecked. Exhibitors will always have access to EventHub's free built-in video chat regardless. Click HERE to learn how to setup this feature and experience it yourself!
- By default, when an attendee goes to an Exhibitor's booth during these Booth Session hours, they will have to click a button to join a live video chat with the Exhibitor. If you want to change it so that whenever someone goes into a booth, they are automatically joined to a live video chat, you can do so by checking the checkbox next to Start Booth Chat Upon Entry.
- IMPORTANT: It is very important that you email your vendors with the Booth Session hours to ensure they are looped in. These are the hours that you are asking them to be sitting in front of their computer, with their video camera on, ready to talk to attendees.
- For an in-depth guide on Booth Sessions, please refer to our article, Adding Live Chat Booth Sessions For Your Exhibitors.
Don't forget to click Save Booth & Session Changes at the bottom of the sidebar!

Main Stage Live Streaming
While still in the Program tab, scroll down and take a look just below the Booth Sessions hours. Here you see the Main Hall Track section. These "tracks" are videos that are scheduled to play on your Main Stage at the specified date and time.
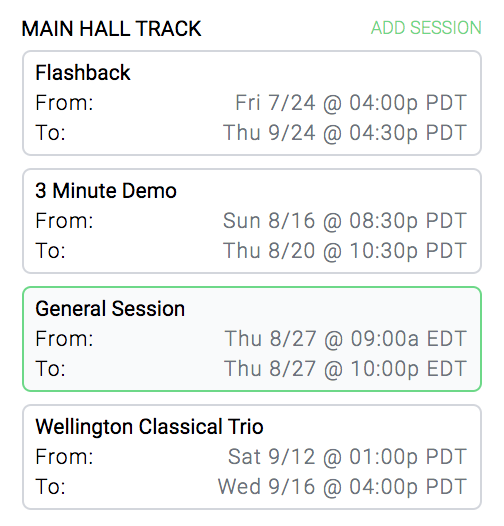
Click ADD SESSION on the right to create a new one, or just click on one already there to edit.
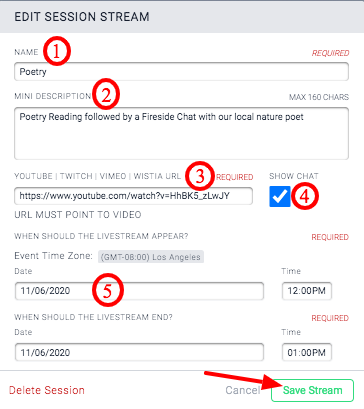
An Add/Edit Sessions Stream pop up appears, where you can enter:
- Name of your Session/Track
- Mini Description: This description will appear on the Schedule page preview, as well as the detailed Session page. More info on this here.
- Streaming URL: Enter the YouTube, Twitch, Vimeo, or Wistia URL.
- Show Chat: When your livestream is live, the side chat bar will be available for viewers to interact with you. If you do not want users to be able to chat you or your livestream is prerecorded, uncheck this box. PLEASE NOTE: If the stream is coming through another platform, you need to make sure Chat is enabled from there (YouTube, Vimeo) for it to show up here.
- Start Date/Time & End Date/Time: When your livestream should appear using this link at the top of the Main Stage page.
NOTE: We schedule the sessions every 5 minutes, and you cannot change the start and end time to something other than on a 5-minute mark. If you have a bunch of short videos, and want them all to autoplay together in the same 5-minute Main Stage session, you can do this by creating a YouTube playlist and linking the URL of the first video in the YouTube URL field in that pop up. For step-by-step instructions on how to do this, please refer to our article on Using YouTube Playlists to Autoplay Videos.
The Main Stage video floats with the attendee as they scroll down the page and through the virtual village and exhibitor's booths. See the example below of how the livestream, and its chat, floats with the user as they scroll down the page.
For an in-depth guide on how to do this, please refer to our article Adding Main Stage Content.
Step 3: Brand Design in the Design Tab
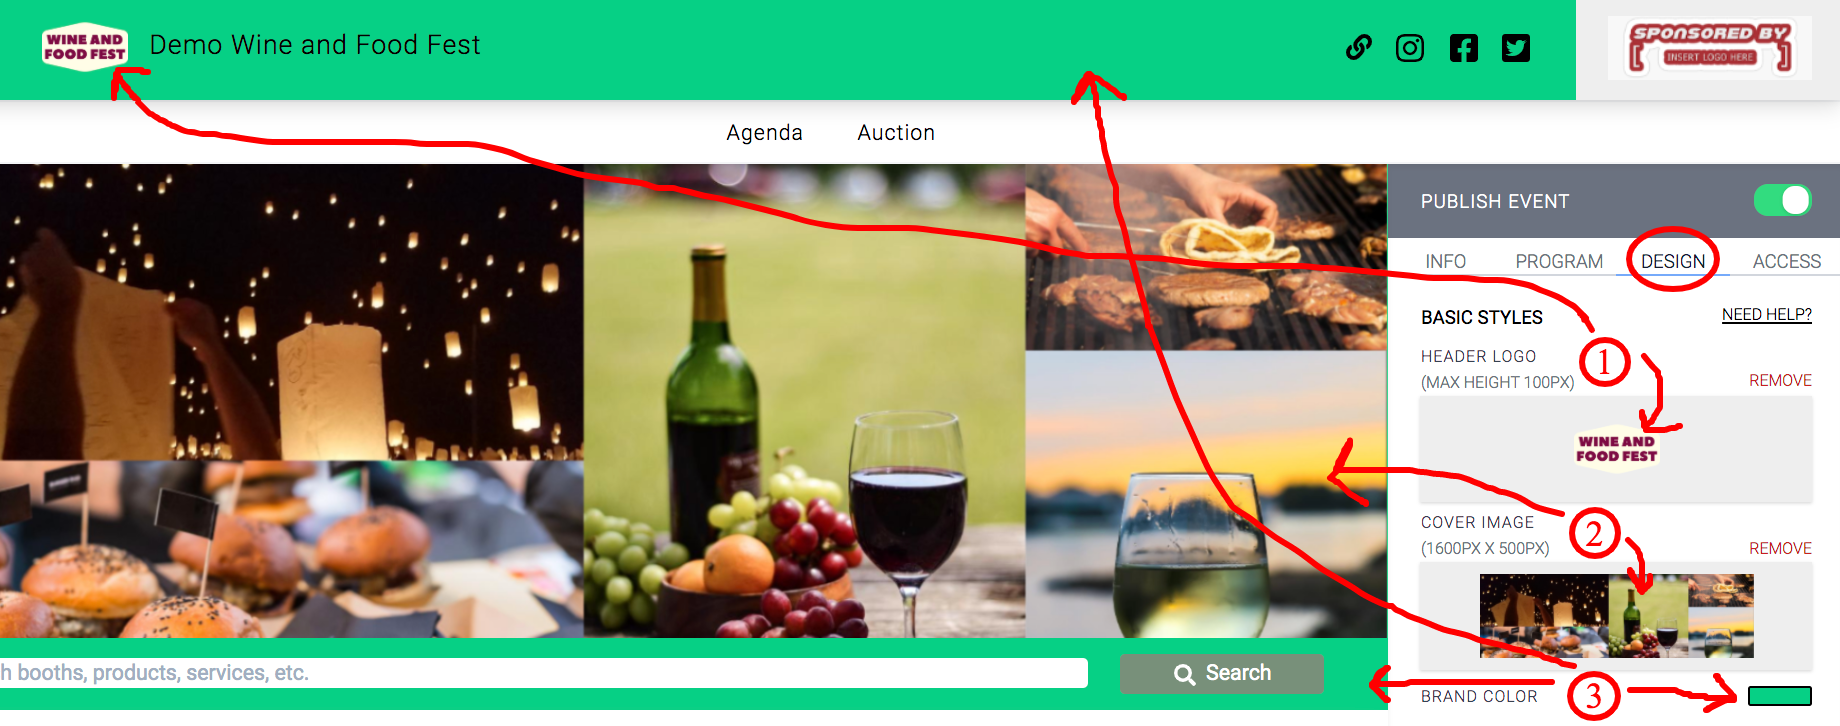
- Upload your header logo - images only (file types: jpeg, jpg and png). Preferred measurements: max height 80px and max width 200px.
- Upload a cover image- images only (file types: jpeg, jpg and png). Preferred measurements: height 500px and width 1600px.
- Select your brand color - click on the hex color picker, select preferred color, or type in your hex code.
Make sure you click Save Design Changes whenever you update these to see your changes reflected on your event.

Want to upgrade to Advance Styles? For more information, see our guide on How To Upgrade and Use Advanced Styles. Email jamien@eventhub.net to unlock this feature! Packages include
- Replacing "Powered by EventHub" with "Presented By" logo AFTER SELLING THE PLACEMENT. Upgrade for $500
- Customization Package: Advanced custom coloring, fonts, white label domain, and Presented By logo swap: Upgrade for $1,300
- Full CSS access for complete customization Upgrade for $1,000* (*Customization Package required)
Step 4: Ticketing in the Access Tab
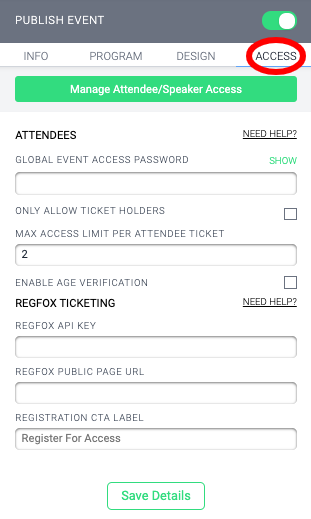
In this tab, you control who has access to your event. The default settings shown above allow anyone to access your event and the virtual vendor village. There are several ways you can restrict this:
- You can set a Global Access Password and send it out to your attendees. Everyone will have the same password, and be prompted to enter it when they visit your Virtual Event for the first time.
- You can only allow folks who have tickets. This can be done by manually uploading your ticket holders and their ticket numbers or by integrating with RegFox. We do not manage or sell tickets to an event. You must use an external ticketing service for attendees to get tickets. There are several services out there, some are free and some cost, where you can charge or offer free tickets to attendees. Let your Account Manager know your preferred platform, and they'll help you integrate with it.
For more information and step-by-step instructions on how to do these, please refer to our guide on Ticket Accessed Events, and specifically out guide on How to Integrate with RegFox.
Activate/Deactivate Virtual Booth Access for Exhibitors
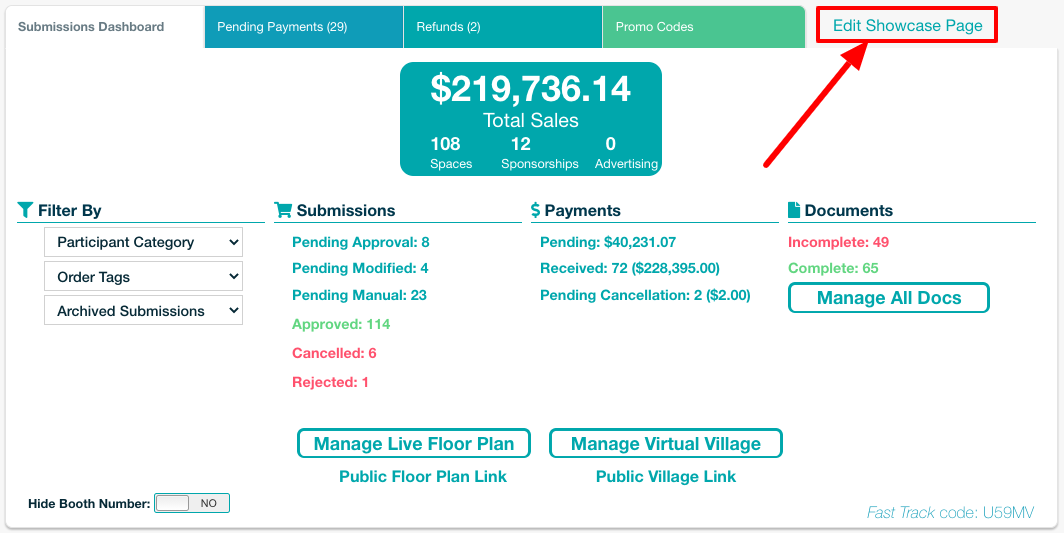
If all of the orders submitted for your event are going to include access to the virtual event with a virtual booth, you will want to turn on the setting to Enable Virtual Booths By Default For All Exhibitors. To access this, click on the Edit Showcase Page link from the Events Dashboard or the Submissions Dashboard.
From Events Dashboard

From Submissions Dashboard
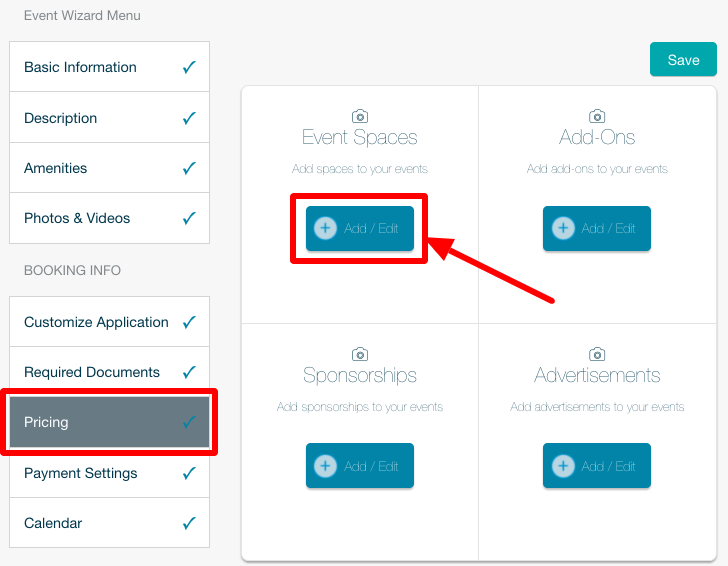
Then select Pricing on the left, and click the + Add/Edit button under Event Spaces.
By toggling Enable Virtual Booths By Default For All Exhibitors to YES, once you approve an order, an exhibitor will immediately be given access to their virtual booth.
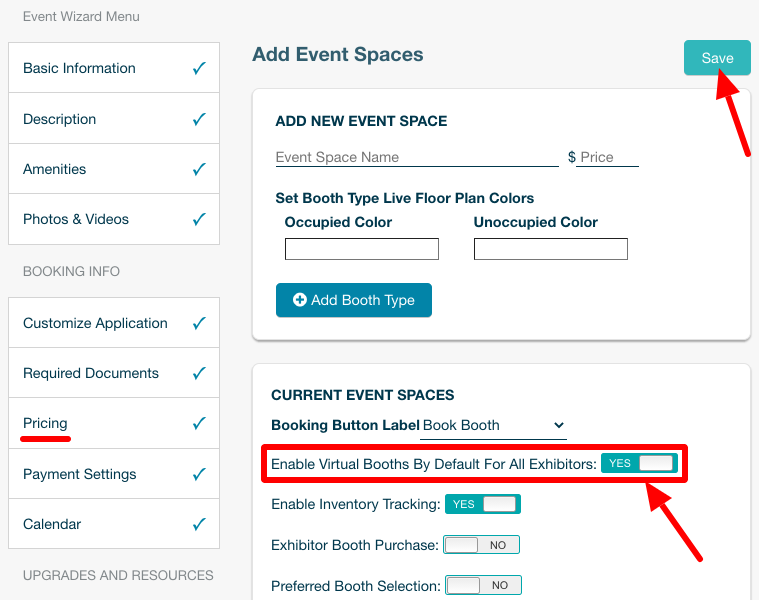
For events that are having a hybrid event, you can keep this toggle set to NO, and if the exhibitor purchased a virtual booth, you can enable their virtual profile via the Submissions Dashboard.
If you are activating virtual booths one by one, you have to Activate Virtual Booth after you approve the exhibitor's order. Back on the Submissions Dashboard, find the order that you've already approved, check the box to select the order, and then select Activate Virtual Booth via the actions dropdown in the upper righthand corner. You can deactivate access using this dropdown as well.
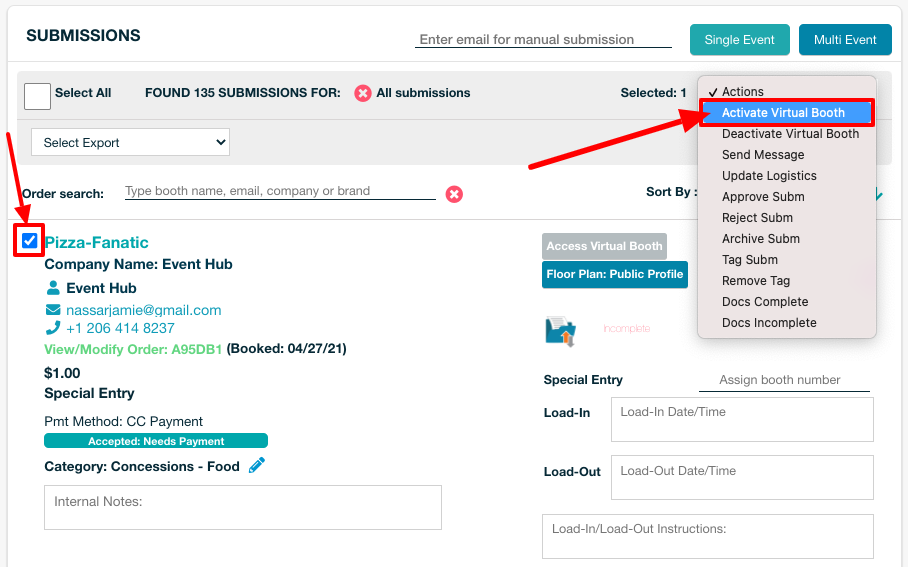
You can also select all orders in your view on the Submissions Dashboard and activate the virtual profile for more than one booth at a time. See it in action in this short video!
Accessing and Publishing an Exhibitor's Virtual Booth
Follow these steps to access a vendor's virtual booth, in both Edit and Preview mode. We also explain how to feature, publish, and edit the booth.
Go to your Submissions Dashboard and click Manage Virtual Village.

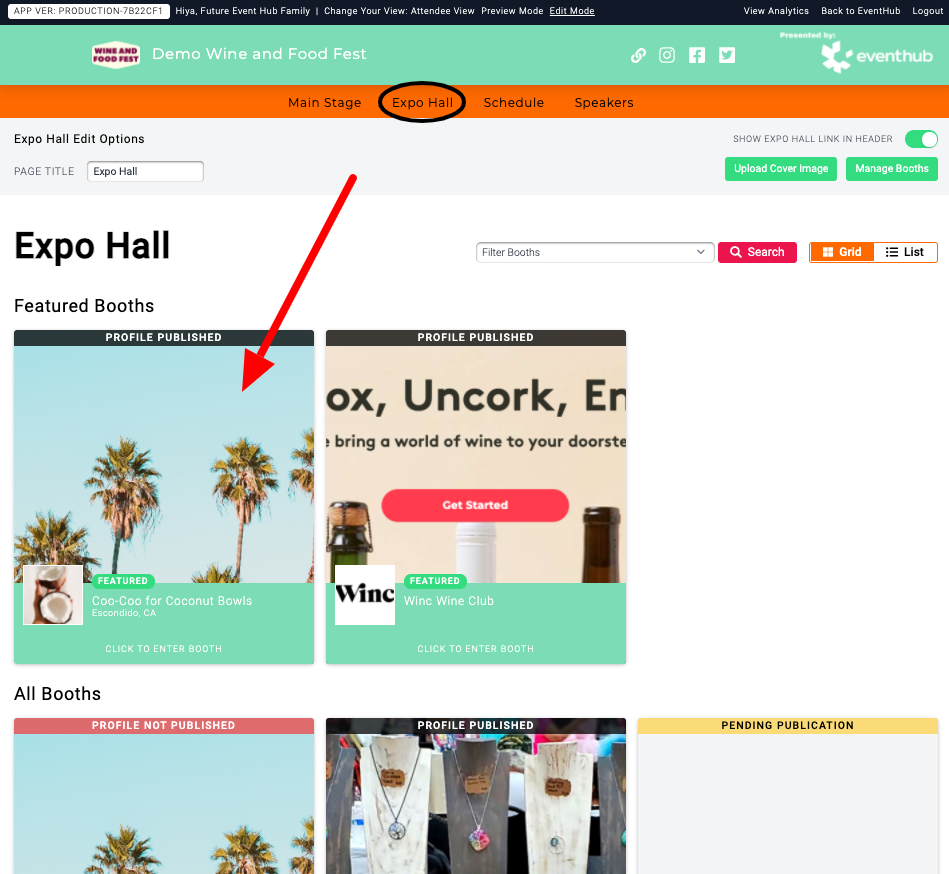
This will open up your Virtual Village landing page, which is the Main Stage. To access the Expo Hall with all the Booths, click Expo Hall in the header link bar at the top.

On the Expo Hall, simply click on one of the Booth images to enter that Booth's page in Edit Mode.
You are now viewing an Exhibitor's Booth in Edit Mode.
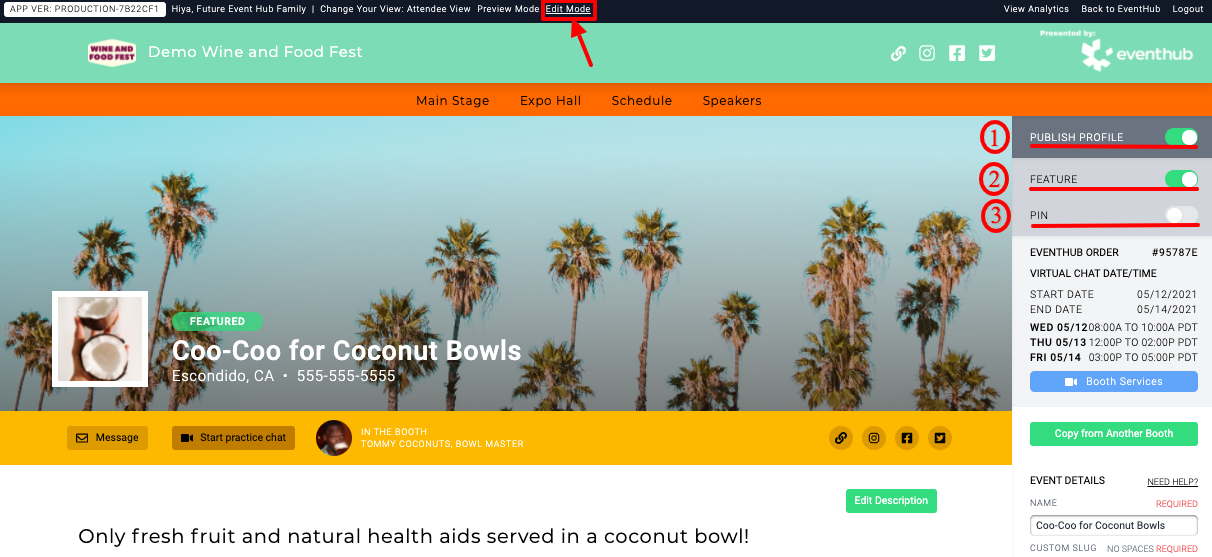
- Publish Profile: Toggle this to green to Publish this booth. Publishing a virtual booth does not make their page visible to the public until your virtual event is actually live. Go ahead and publish their virtual booth as soon as it is ready. We suggest giving them a timeline with deliverables.
- Feature: Enabling this means the booth will appear above all the others in the "Featured" section on the Main Event page. In this screenshot above, we chose to feature this booth, which means it appears on the top of the Expo Hall page in the "Featured Booths" section. For more info on how to feature a booth, CLICK HERE.
- Pin: Enabling this means the booth will appear at the top of the "All Booths" section (still below "Featured") on the Main Event page. In this screenshot above, we did not choose to pin this booth. For more info on pinning a booth, CLICK HERE.
When you go back to the Expo Hall, you'll notice you can filter booths by Type. These filters are drawn from the Tags that Exhibitors set on their Display Items. If a booth has a certain tag on at least one of their Display Items, then that booth will be returned by this tag in the filter dropdown from the Main Stage. For more information on how Display Items work, click here.
If you access the virtual booth in Attendee View before the booth is published, you will get this message. Why? That is because their page is not published (in-progress).

Leaving Your Event Unpublished
If you want to hide your Virtual Village page to the public while it's still being worked on, you can leave it unpublished by simply leaving the "Publish Event" toggle off (grey) in the righthand editing sidebar on your main event page. So it looks like this:

You and your exhibitors can still access the event and keep editing it, you'll just see this warning at the top of the page:

All Organizers and Exhibitors with approved orders still have access, anyone else who tries to access the event will see the following:

Don't forget to publish it for showtime! Read on for how to do that...
Publish Your Virtual Village
When you are ready to make your virtual expo/village live for attendees to access, go ahead and click on the Publish Event toggle! Green means it is enabled. Make sure you are in Edit Mode to do this (as shown by the underline and box below).

Link to Share with Your Attendees

Switch from Edit Mode to Attendee View in the header. The link displayed on your browser's URL field is the link attendees will use to access your event and virtual village. Now remember, editing the URL slug will make the previous URL expire (meaning invalid) so be sure to lock in your customized URL slug before you share the public link! Each exhibitor booth has their own URL.
Suggested Article: Creating your event's registration Showcase Page


Comments
0 comments
Please sign in to leave a comment.